Clients struggling to share access to their
accounts? Get the access you need in minutes with a free trial of Leadsie.
14 day unlimited free trial
Extend until you onboard a client
No credit card required
Keep access to clients if you cancel

With easy one-link access requests for 13+ platforms your campaigns can go live in minutes, not days. Start free today.
Approved by Meta, Google & Tiktok
Keep access to clients' accounts if you cancel
Secure & 100% GDPR compliant


Creating a Facebook Page for a business is easy, but making sure it’s set up correctly and optimized to be found and trusted is where many businesses and marketers struggle. With over 200 million businesses using Facebook, simply having a Page isn’t enough to stand out.
Decisions like how the Page is created, who owns it, and how it’s configured affect everything from access and advertising to visibility and long-term management.
In this guide, we’ll walk you through the different ways to create a Facebook Page, how to choose the right setup method, and top tips to optimize it for visibility and growth.
Want to skip ahead? Jump straight to the steps:
👉 Method 1: Create it directly in Facebook (standalone Page) — quickest option for small businesses managing their own Page.
👉 Method 2: Create it in a Business Portfolio (Meta Business Suite) — best for businesses with larger teams, advertising needs, or agencies managing the Page.
Creating a Facebook business Page gives you access to a range of free professional tools that help businesses build their brand, reach customers, and manage marketing activities across Meta.
Here’s what you can do once it’s set up:
✔️ Use a unified inbox for customer communication
View and respond to Facebook and Instagram messages and comments in one place, plus publish posts and Stories directly from the Page.
✔️ Use messaging as a lead and support channel
Enable Messenger or WhatsApp buttons so customers can contact the business directly from the Page, posts, or ads.
✔️ Build and engage an audience
Grow followers, share content into feeds, participate in Facebook groups as the Page, and collect reviews and recommendations.
✔️ Appear in local search and discovery
For location-based businesses, a Facebook Page can appear in local search and recommendations. Accurate address, hours, and categories help nearby customers find and contact the business.
✔️ Run ads across Meta platforms
Boost posts, promote offers or websites, grow Page followers, and advertise on Facebook, Instagram, Messenger, and the Audience Network (Meta’s network of third-party apps and websites where ads can appear).
✔️ Track performance with Insights
Access Page and audience analytics, including reach, engagement, follower growth, Page actions, and ad results in Meta Business Suite.
✔️ Manage brand presence across Meta
Link Instagram to your Facebook Page, respond to IG messages and comments, and keep your business information consistent across both platforms.
There are two ways to create a Facebook Page: directly in Facebook from a personal account (standalone) or inside a Meta Business Portfolio.
👉 With standalone Page creation, the profile used during setup becomes the initial Page owner with full control.
The flow also guides you through a comprehensive setup, such as adding business details, contact information, visuals, messaging options, and audience invites, so the Page is more complete as soon as it’s published.
This method is typically used when:
A standalone Page can be added to a Business Portfolio later if needed.
👉 A Business Portfolio Page is created within the portfolio itself, which owns the Page from the start and manages access centrally.
The creation flow is shorter and focused on establishing the Page as a business asset, so additional setup can be completed afterward directly on the Facebook Page.
This method is designed for:
Because ownership sits with the business rather than an individual profile, access and integrations (like Instagram) can be managed centrally.
❓ Which should you choose?
For individuals or small businesses managing their own Page, standalone creation is usually sufficient.
For teams or businesses working with external partners (such as marketing agencies), creating the Page in a Business Portfolio is recommended so ownership and access are managed at the business level.
If you’re creating a Facebook Page directly from Facebook (outside of a Business Portfolio), you can do it in a few minutes from either desktop or mobile.
📝 Before you start, you’ll need a personal Facebook profile. Facebook Pages are always created from an individual account (don’t worry, your personal profile won’t be visible on the Page unless you choose to share it).
Follow these steps to create a standalone Facebook Page on desktop:
Step 1. Log in to Facebook using a personal profile. That account will automatically receive full control.
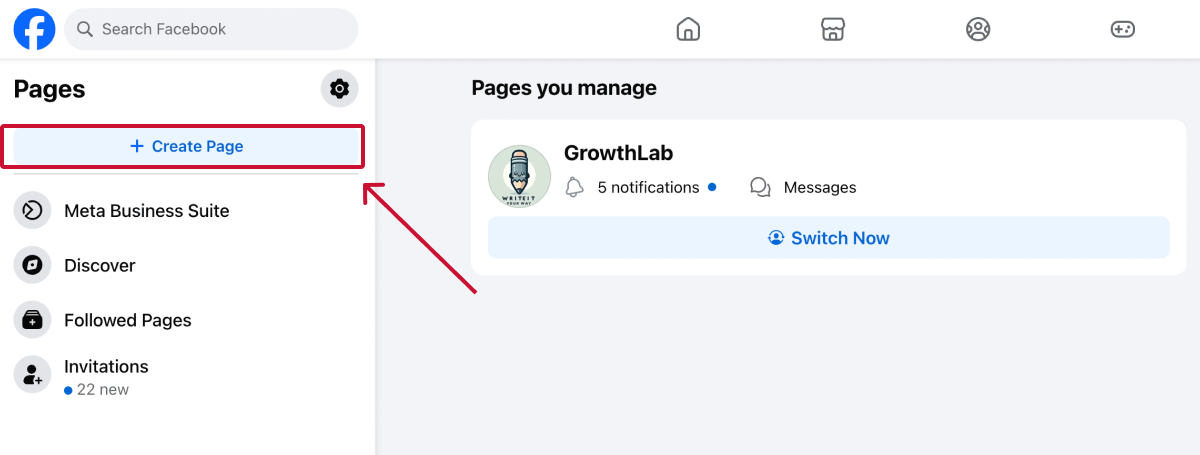
Step 2. Click “Pages” in the left sidebar.

Then select “Create Page.”
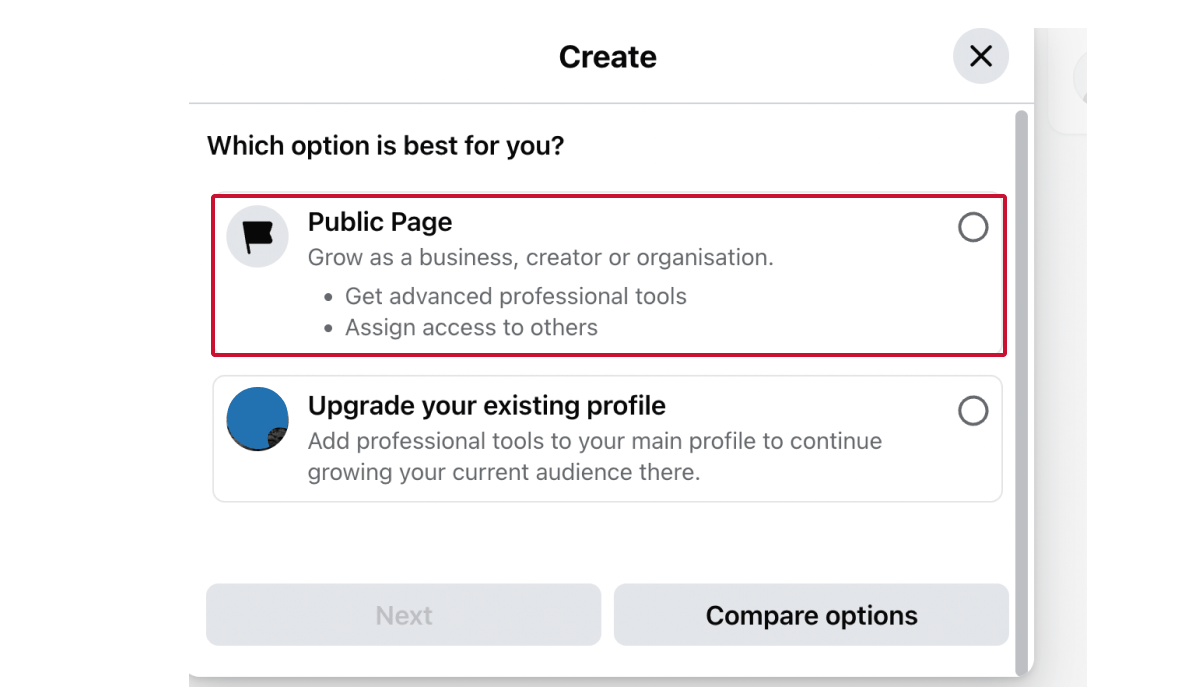
Step 3. Facebook may ask whether you want to create a Page or use professional mode on your profile. In this case, select “Public Page.”
💡 What’s professional mode? Professional mode turns your personal profile into a public creator profile with followers and creator tools. However, it doesn’t create a separate business Page or support business tools found in Business Suite.
Learn more about professional mode here.
Step 4. Enter the Page name (usually the business name) and category (what the business does).
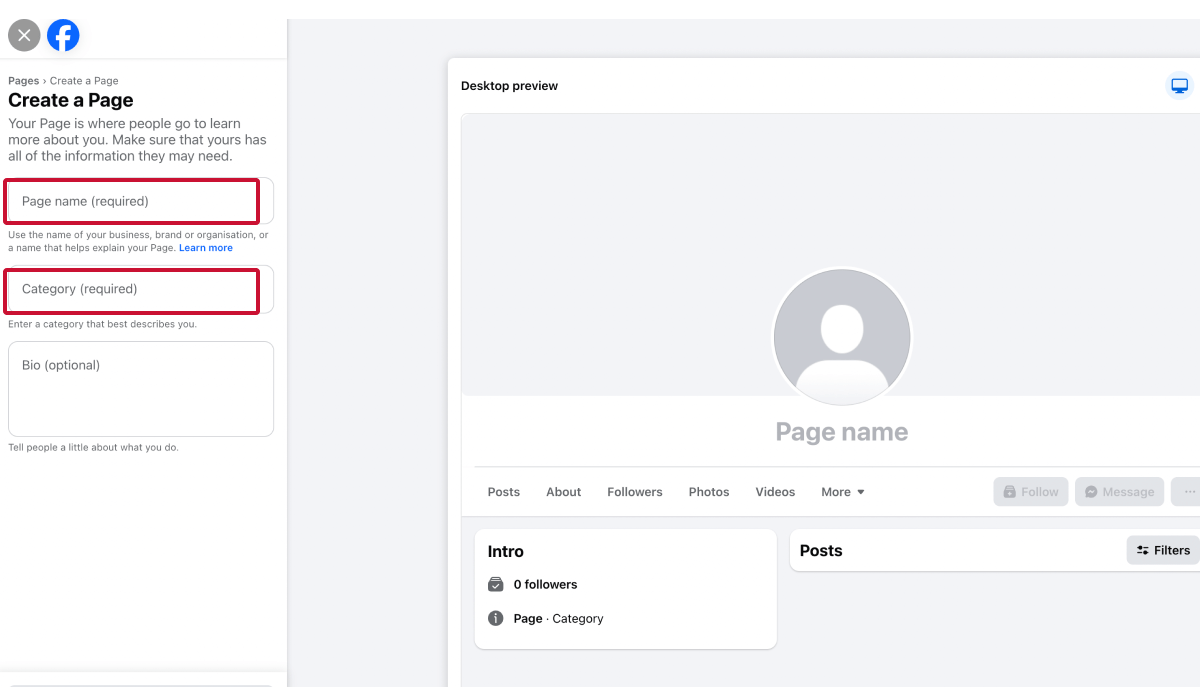
The name should match the real business name customers know and search for, and avoid slogans, extra keywords, or promotional phrases. Check out Meta’s guidelines for Facebook Page names for more rules to look out for.
The category determines which features your Page can use (for example, restaurants, local services, and ecommerce businesses may see different tools).
💡 Tips for choosing a category
Step 5. You can optionally add a short bio (100 characters max) to help visitors understand the business at a glance.
This should quickly explain:
Example: “LA-based dog grooming salon offering gentle, breed-specific grooming for small and medium dogs.”
Step 6. Click “Create Page.”
* The following setup steps are all optional, so you can always add or edit those details later. *
Step 7. While your Page is now created, Facebook will prompt you to complete the setup by adding key details such as:
Adding complete information improves credibility and makes it easier for customers to contact or visit the business.
It also improves local discoverability, especially for location-based businesses.
Step 8. Click “Next.”
You can now upload a profile picture (usually a logo) and a cover photo.
These visuals are often seen in ads and search results, so strong branding here can improve recognition and engagement.
Step 9. Select a call-to-action button such as:
Choose the option that best supports the primary business goal (enquiries, bookings, sales, etc.).
Step 10. Connect a WhatsApp number to your Page to encourage visitors to contact the business directly via WhatsApp from buttons on the Page.
To connect it, enter the phone number linked to your WhatsApp account and confirm the verification code sent to that number.
If the business doesn’t use WhatsApp, you can skip this step and add messaging options later.
Step 11. Facebook will also suggest inviting your friends to connect with the new Page.
Pages with a larger follower base often perform better in ads and recommendations, as followers signal trust and help Meta understand the Page’s audience. Even a small initial follower base helps the Page look established when new visitors or ad audiences check it.
You can invite people now or skip and do this later.
Step 12. Select whether you want notifications about Page activity and optional emails from Meta. Enabling notifications helps you stay aware of messages, comments, and updates.
You can change these anytime in Page Settings.
Step 13. Click “Done” to finish setup and publish the Page.
Your Facebook business Page is now live. 🎉
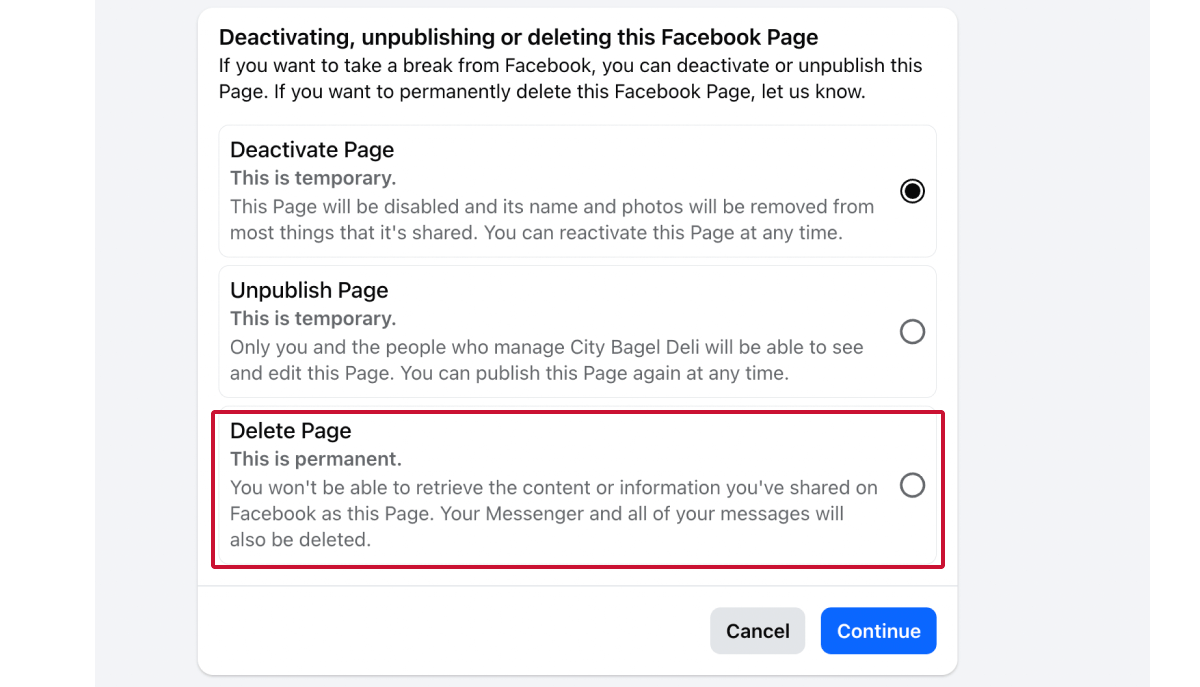
❗ Note: To delete a Page, you must have Facebook access with full control.
1. Switch into the Page from your profile, then go to Settings > Access and control > Delete Page and follow the prompts. The Page will be deactivated immediately, but permanently deleted after 30 days.
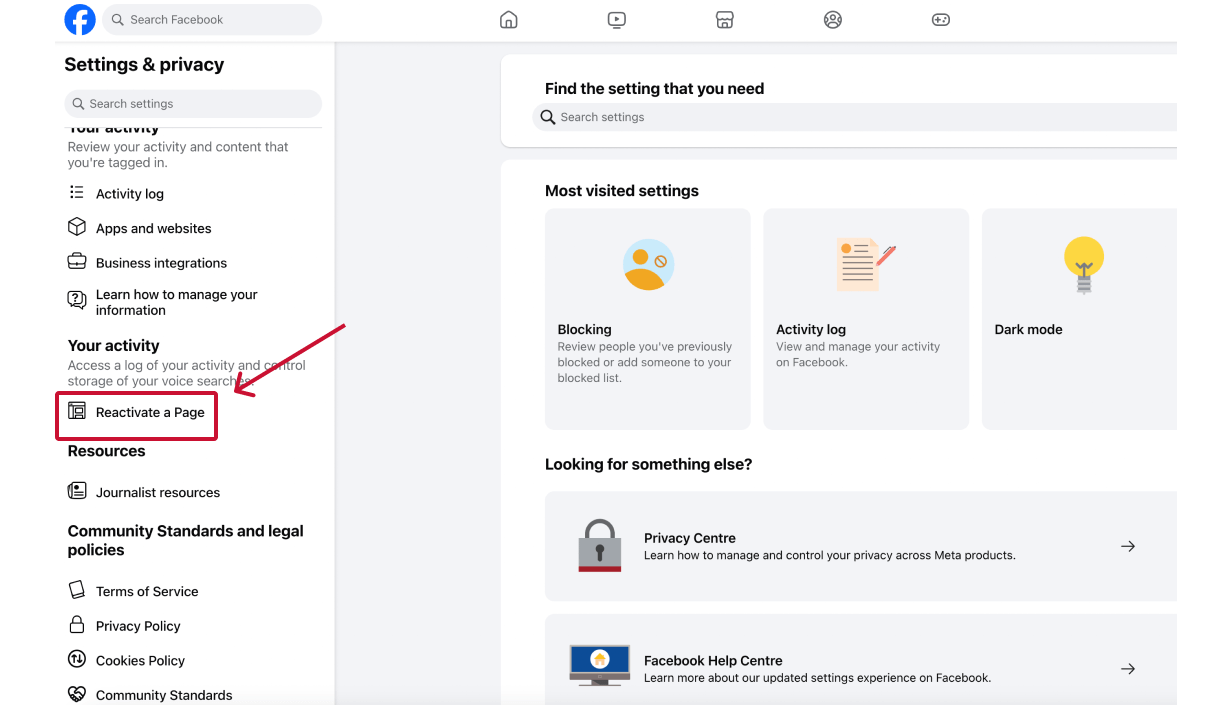
2. If you change your mind within 30 days, go to your personal profile Settings, select “Reactivate a Page” under Your activity, choose the Page, and click Reactivate to cancel deletion.
💡 If you don’t want the Page visible but may use it later, you can deactivate or unpublish it instead of deleting it.
If you’re creating a Facebook Page for a business or client, the best practice is to create it directly inside the organisation’s Business Portfolio.
This ensures the business, not an individual profile, owns the Page and controls access from the start.
📝 Before you begin, make sure you have full control of the Business Portfolio. If not, follow this guide on how to give and request access to a Meta Business Portfolio.
Step 1. Head to “Settings” in Meta Business Suite to access your Business Portfolio.
Step 2. Under Accounts, select “Pages,” then click “Add” and choose “Create new Facebook Page.”

Step 3. Enter the core information that describes the business:

You can update these details at any time after the Page is created.
Step 4. Review the Business Portfolio that will own the Page and confirm creation. You’ll need to agree to Meta’s commercial and Page policies on behalf of the business.
Once created, the Page will be owned by the Business Portfolio and accessible to people with portfolio access.
Step 5. Click “View on Facebook” to open the Page. From there, you can finish configuring settings such as business information, visuals, messaging, and permissions.

💡 Note: Once created, Page content and settings are managed on the Facebook Page itself. The Business Portfolio is primarily used to manage ownership, assign access, and connect assets like Instagram or ad accounts.
If other people need to manage your Facebook Page, such as team members or an agency, you can grant them access in Page settings.
❗ Note: You must have full control of the Page to add or remove access.
Here’s how:
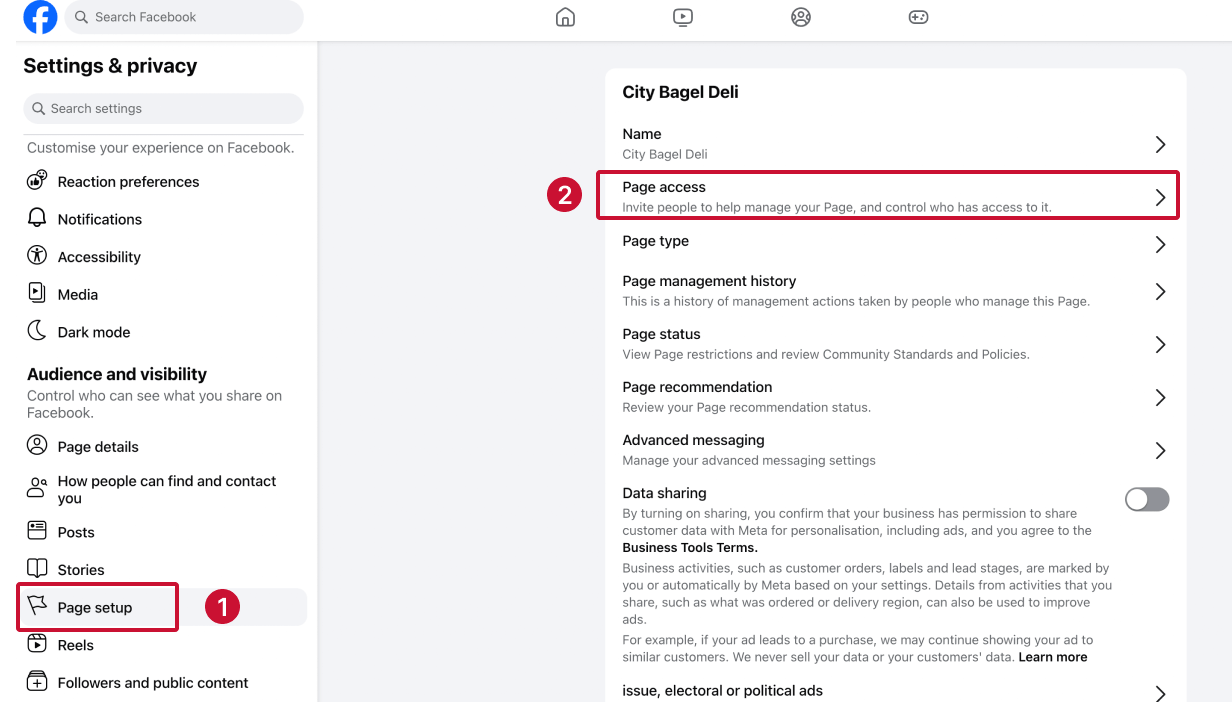
1. Switch into the Facebook Page.
2. Go to Settings > Page setup > Page access.
3. Click “Add New” next to People with Facebook access.

4. Enter the person’s name or email (they must have a personal Facebook profile) and choose their access level (full or partial).
5. Confirm with your password.
The person will receive an invitation and can manage the Page once they accept.
❗ Careful: Full control allows someone to manage access and delete the Page. For most team members or agencies, partial access is usually sufficient.
👉 If your Page is owned by a Business Portfolio:
Access is assigned in Meta Business Suite > Settings > People > Assign assets > Pages. This is typically how businesses give agencies or teams Page access.
✅ Are you an agency requesting access to a client’s Facebook Page?
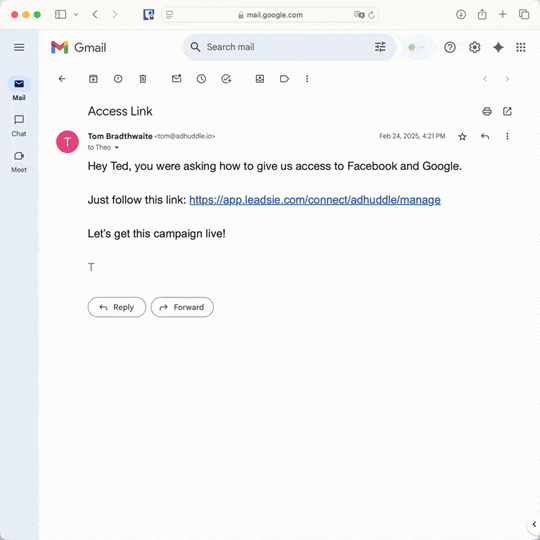
Leadsie is a client onboarding tool that lets clients securely grant Facebook Page and Meta asset access without password sharing or navigating complex Meta settings.
All you have to do is send your client your unique access request link. They log in to Facebook, select the assets (Pages, ad accounts, etc.) they want to share, and approve access in a few clicks. Learn more about requesting Facebook Page access with Leadsie here.
🔗 Related article: How to Request Access to a Facebook Page
Think of your Page as a digital front door for your business; what visitors see there strongly influences whether they follow, contact, or convert.
Here are some key ways to optimize your business Page.
Your Page categories influence how your business appears in Facebook search and recommendations.
Use the most specific and relevant categories available, and ensure your Page name and description reflect what customers would search for.
Your cover image is one of the first things visitors see when they land on your Page. Use it to reinforce what your business does, highlight a key service, or communicate a clear next step (for example, “Book online,” “Now accepting clients,” or “Free consultation”).
This helps new visitors quickly understand your value and increases the likelihood they’ll engage or contact you.
Create a pinned post that clearly introduces your business, who you serve, and how customers can take the next step (for example, contact, book, or visit).
Many visitors check a Page’s top or recent content before deciding to message or follow, so a pinned post acts as a quick overview and conversion touchpoint.
👉 This is especially useful for service-based, local, or niche businesses where the offering may not be immediately obvious from the Page name alone.
Recommendations and reviews increase trust and can improve visibility in search results. Encourage satisfied customers to leave reviews and respond to them to show engagement and credibility.
Reviews often appear prominently on the Page and in search results, so even a small number of positive recommendations can increase trust and click-through.
Regular posting signals that your business is active and relevant, which helps your Page appear in feeds and recommendations.
✔️ Share content that reflects your products, services, updates, or expertise, and engage with comments and messages to maintain interaction.
✔️ Post at least 1-3 times per week with relevant updates, offers, or educational content to signal activity.
✔️ Use a mix of content formats such as images, video, text posts, Stories, or Reels. Pages that share varied formats tend to see higher engagement because both audiences and the Facebook algorithm favor diverse content.
If you plan to run ads, publish several organic posts on the Page first so it shows visible activity and context.
People often click through to a Page after seeing an ad to assess credibility and relevance. A Page with recent posts, engagement, and clear messaging typically converts better than one that looks empty or inactive.
Your Facebook Page isn’t just for organic content; it’s also the foundation for advertising across Facebook, Instagram, Messenger, and the Meta Audience Network.
Running targeted Page-focused campaigns can increase visibility, followers, and conversions.
For example, you can:
Page Insights show which posts, audiences, and actions drive engagement. Use this data to understand what content resonates and adjust posting topics, formats, and timing accordingly.
⭐ Tip: Look for patterns in posts with higher reach or engagement and prioritize similar content.
For advertisers, Insights also reveal audience demographics and interests (such as age, location, and engagement behavior), which can guide who you target in ads and how you tailor messaging.
👉 Managing Pages for clients? Use a Facebook Page audit checklist to review optimization opportunities.
If you’re having trouble creating, accessing, or managing a Facebook Page, check the common issues below and how to resolve them.
If Facebook won’t let you create a Page, check:
Facebook limits how many Pages a profile can create within a short period. If you see a limit error, wait and try again later.
Page names must match the business and follow Meta’s naming guidelines.
Names may be rejected if they:
Use the real business name and move marketing language to the bio or About section.
This usually means you don’t have sufficient permissions.
Check that you:
If the Page is in a Business Portfolio, access must be assigned there.
🔗 Related article: Lost Access to a Facebook Business Page? Here's How to Regain Admin Access
Only people with full control can manage access. If you don’t see the option:
Every Page must have at least one person with full control to remain active.
🔗 Not sure who has permission to update your Page access? Learn how to see who owns and has access to a Facebook Page.
If a Page isn’t visible, it may be:
Check the Page status in Settings or ask the business/portfolio owner to confirm ownership and visibility.
If Instagram won’t connect, check:
🔗 Related article: How to Change Your Instagram Personal Profile to a Business Account
Spending hours on multiple calls, reminder emails, lengthy PDFs, or sharing passwords to access clients’ ad and social accounts? Leadsie has a better solution.
Don’t place the administrative burden on your new clients during client onboarding. Send them a secure Leadsie link that’ll get your agency access to 20+ platforms at once. The best part? The access doesn’t expire, and no one is risking account security by sharing logins. 🔒
Leadsie is a client onboarding software that simplifies requesting and giving access to marketing assets, social media, and ad accounts with one secure link. Get access to your clients’ or influencers’ Facebook, Instagram, Google, TikTok, Shopify, LinkedIn, X, and other accounts without sharing passwords. 🔒
Leadsie speeds up client onboarding by replacing manual access requests with one secure approval link. You send the link to your client, they review and approve the permissions you’ve requested, and your agency gets instant access to their accounts.
✅ Reduces your agency's turnaround time by over 50%
✅ Scales with your agency as you onboard more new clients every month
✅ Start billable work and billing cycles for your new clients without delays
✅ Save hours of time and get access to 23+ social, marketing, and analytics platforms at once (including Google Ads!)
🎁 Try Leadsie for free with a 14-day trial—no credit card needed!
P.S. It's risk-free and you get to keep the account connections after the trial ends 🙌

Nina is an SEO content specialist with expertise in B2B SaaS. She helps businesses increase organic traffic with strategic, high-quality content. Outside of work, you’ll find her sailing somewhere in the Mediterranean.


Clients struggling to share access to their
accounts? Get the access you need in minutes with a free trial of Leadsie.
Approved by Meta, Google & Tiktok
Keep access to accounts if you cancel
Secure & 100% GDPR compliant
Delete your onboarding PDF. Cancel the video call. Just send one link, and get hassle-free access to 13+ platforms in minutes. Start free today.
Approved by Meta, Google & Tiktok
Keep access to clients' accounts if you cancel
Secure & 100% GDPR compliant
Yes. Facebook requires every Page to be created from a personal profile. Your personal profile is not visible on the Page unless you choose to share it. Once created, the Page can be managed by multiple people or transferred to a Business Portfolio.
Not exactly. Facebook offers a migration tool that can move some information from a profile to a Page, but profiles and Pages remain separate entities. For businesses, creating a dedicated Facebook Page is the recommended and most stable setup.
Yes. A Page created from a personal profile can be added to a Business Portfolio later, which transfers ownership to the business. However, you must have full control of the Page and the Business Portfolio to do this.
If the Page was created from their personal profile and not added to a Business Portfolio, they may still be the owner. This is a common cause of lost access. Businesses should add Pages to a Business Portfolio or ensure multiple people have full control to avoid this risk.
Yes. The recommended approach is to create it inside the client’s Business Portfolio so the client owns the Page from the start. Agencies should avoid creating Pages from personal profiles unless ownership will be transferred immediately.
To do this, the agency needs access to the client’s Business Portfolio. Tools like Leadsie let clients securely grant Meta asset access (including Business Portfolio and Pages) without password sharing or navigating complex Meta settings.
Questions unanswered? Check out our help center or get in touch 🤠