Clients struggling to share access to their
accounts? Get the access you need in minutes with a free trial of Leadsie.
14 day unlimited free trial
Extend until you onboard a client
No credit card required
Keep access to clients if you cancel

With easy one-link access requests for 13+ platforms your campaigns can go live in minutes, not days. Start free today.
Approved by Meta, Google & Tiktok
Keep access to clients' accounts if you cancel
Secure & 100% GDPR compliant


If you’re running Meta ads, you already know that precise targeting can have a huge impact on your results. In fact, campaigns optimized for conversions can deliver 2-3x higher return on ad spend compared to those that that don’t have conversion tracking set up.
Meta Events Manager is the tool that makes this possible.
This is where Meta collects and manages the actions people take after clicking your ads. And while you don’t build campaigns here, Events Manager plays a big role in how your ads perform.
Like most Meta tools, it can feel confusing at first. But once you understand how it works, it becomes much easier to track conversions, build stronger audiences, and improve ad performance. ✅ ⬆️
In this guide, we’ll walk through what Meta Events Manager is, how events work, and how to set them up step by step so you can feed accurate data into Meta Ads Manager.
Meta Events Manager is a tool that collects information about what people do after interacting with your ads, such as visiting a page, submitting a form, or completing a purchase.
That data is then used by Meta Ads Manager to automatically optimize who sees your ads, when they see them, and which ads are shown to people most likely to convert.
From Events Manager, you can:
✔️ Set up and manage tracking integrations, such as Meta Pixel, Conversions API, Facebook SDK (these tell Meta what people do after clicking your ads)
✔️ Check whether important actions on your website, like purchase, are being tracked correctly
✔️ Compare how actions perform across your website, app, and other connected sources over time
✔️ Use collected data to build audiences for advertising
👉 Keep in mind: While you don’t create ads in Events Manager, the data managed here is directly synced with Meta Ads Manager. That means if Events Manager isn’t set up correctly, your ad optimisation will be impacted, even if your ads themselves are well built!
🔗 Related: How to Create Custom & Lookalike Facebook Audiences
Events are specific (trackable) actions people take when interacting with your business, most commonly on your website or app.
Examples include:
These events are shared with Meta through tools such as the Meta Pixel and Conversions API, which send data from your website, app, CRM, or other sources back to Meta.
👉 Bonus: If you’re running e-commerce campaigns, these events can also be used alongside a Meta product catalogue to show users the exact products they interacted with.
Meta uses several terms around events, but there are only two main types you need to understand: standard events and custom events.
Some of the most commonly used standard events include:
Because Meta is already familiar with these events, its ad system is trained to optimize around them. This makes it easier for Meta to find people likely to convert and build accurate remarketing and lookalike audiences.
They’re useful for more specific scenarios, such as:
Custom events are created using the Meta Pixel or Conversions API and can be used for conversion optimization and audience building, just like standard events.
📝 Note: Whenever possible, it’s best to use standard events first, since Meta already understands them and can optimize around them more effectively.
👉 Want to track more specific actions after your events are up and running? Once you’re tracking standard or custom events, you can take things a step further with custom conversions .
Custom conversions let you apply rules to existing events to measure more specific outcomes without creating a brand-new event or changing your tracking setup. For example, you might want to track only purchases over $100.
This makes custom conversions especially useful when you already have events running and simply need more granular reporting.
If you rely on Meta ads to drive leads, sales, or signups, Events Manager plays a key role in making sure your tracking and ad optimization work.
You should pay attention to Events Manager if:
If you’re only boosting posts or haven't yet started tracking conversions, you likely won’t need Events Manager.
But once you move into performance-based advertising, it becomes essential.
Agencies: if you manage ads for clients, this short video shows how to create client Meta assets and request access in just a few clicks. 👇
🔗 Related: How to Request Access to Meta Ads Manager
Whether you’re a business owner, marketer, or agency, Meta Events Manager helps turn ad clicks into measurable results.
Here’s how it can help you:
One of the biggest advantages of Meta Events Manager is that you’re not limited to tracking website activity alone.
You can collect action data from multiple sources, including:
You can also connect many third-party platforms using Meta’s partner integrations, which makes setup easier if your business runs on tools like Shopify, WooCommerce, Amazon, or Etsy.
This means Meta can optimize ads based on the full customer journey, not just what happens in a browser.
Events Manager helps ensure Meta receives reliable action data. When Meta knows which ads lead to real outcomes, it can automatically prioritize delivery to people who are more likely to convert.
This means your budget is spent on higher-intent audiences rather than wasted on clicks that don’t lead to results.
It also improves attribution, so you can see which campaigns actually drive revenue and pause the ones that don’t.
Setting up events in Events Manager helps Meta understand what happens after someone clicks your ads.
Before you start, make sure you have:
✅ A live website (not a staging or local version)
✅ Access to Meta Events Manager with permission to manage data sources
✅ The ability to update your website, either through:
Step 1. Go to Meta Events Manager and click “Connect data” in the top-left corner.

You can also access Meta Events Manager from:
Step 2. Select the data source that applies to your business. Most businesses start with their website, so we’ll use that as the example here.
Choose “Web,” then click “Next.”

Step 3. Meta will ask you to connect to an existing dataset. If you’re new to Events Manager, choose “Create new dataset.”

💡 A Meta dataset is simply a container that holds events from different sources, such as:
Instead of managing these separately, Meta consolidates them into a single dataset so you can view and manage all customer actions in one place.
Give your dataset a name and continue.
Step 4. Choose which ad account(s) should be connected to your new dataset. This should be the ad account you plan to run ads from.
Step 5. You’ll now be asked how you’d like to connect your site.
You’ll notice that Meta highlights one option as recommended. This suggestion is based on your account setup and Meta’s tracking preferences, but it doesn’t mean the other connection methods won’t work just as well for your use case.
There are three main options:
👉 1) Conversions API Gateway (advanced)
Sends events directly from your server, alongside browser-based Pixel events. This helps capture conversions that might otherwise be missed due to ad blockers or browser privacy settings, giving Meta more reliable data for optimization.
Best for:
👉 2) Partner integration (recommended for most businesses)
Connects your site through website hosting platforms like Shopify or WordPress.
Best for:
Meta installs the Pixel for you, enables standard events, and often activates the Conversions API automatically.
👉 3) Manual setup
You’ll install the Meta Pixel yourself by adding code to your website or tag manager. This option gives you more control over your tracking setup and is useful if your site isn’t supported by Meta’s partner integrations.
Best for:
🔗 Want a full walkthrough of each setup option? Check out our step-by-step guide on how to create and install a Meta Pixel.
Step 6. If you use partner integration or Conversions API Gateway, Meta will automatically enable standard events.
If you choose manual setup, you’ll be guided to Meta’s Event Setup Tool to create your events.
You can also access this tool later from Events Manager by opening your dataset and clicking on Settings > Event setup > Open event setup tool.

Step 7. Enter your website URL and click “Add events.”

Meta will scan your site and suggest common events. Review each one and click Confirm or Dismiss.
To add events that don’t appear automatically, navigate your site as usual and select:

When you’re done, click “Finish setup.”

💡 Good to know: Enable advanced matching so Meta can send hashed customer details (such as email addresses) along with your events. This helps Meta match conversions to real users more accurately and attribute more results to your ads. You can review or adjust this at any time from your dataset’s Settings tab.
Custom conversions let you narrow down existing events to track more specific outcomes, such as purchases over a certain amount or leads from a particular page.
Here’s how to create one:
Step 1. Go to Meta Events Manager, then click “Custom conversions” and select “Create custom conversion.”
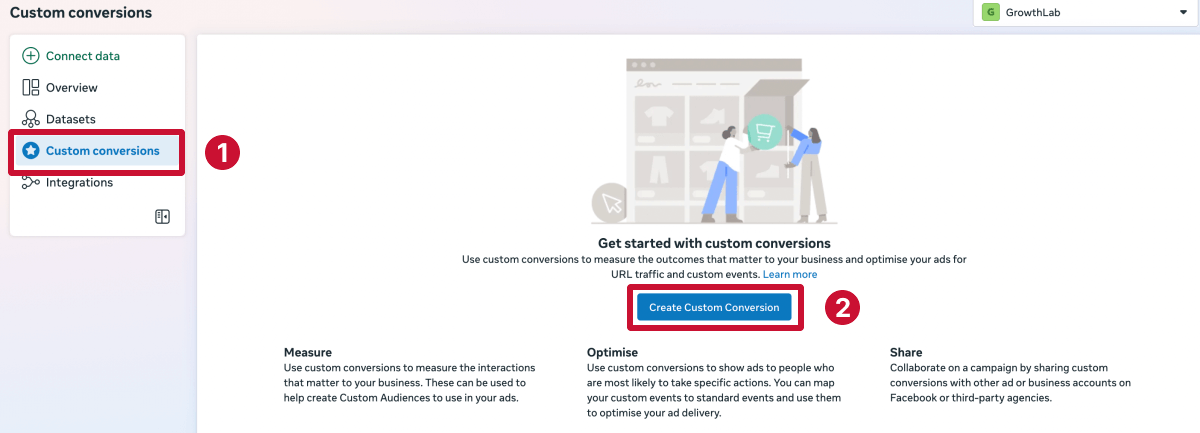
Step 2. Give your custom conversion a name, select the data source you’re using, then choose the event you want to refine.
Meta will automatically assign an optimization category for you. In most cases, it’s best to keep the suggested option, since this helps Meta show your ads to people most likely to take that action.
Step 3. Add rules to define what counts as a conversion. For example, you might track conversions only when someone reaches a thank-you page or a specific product URL.
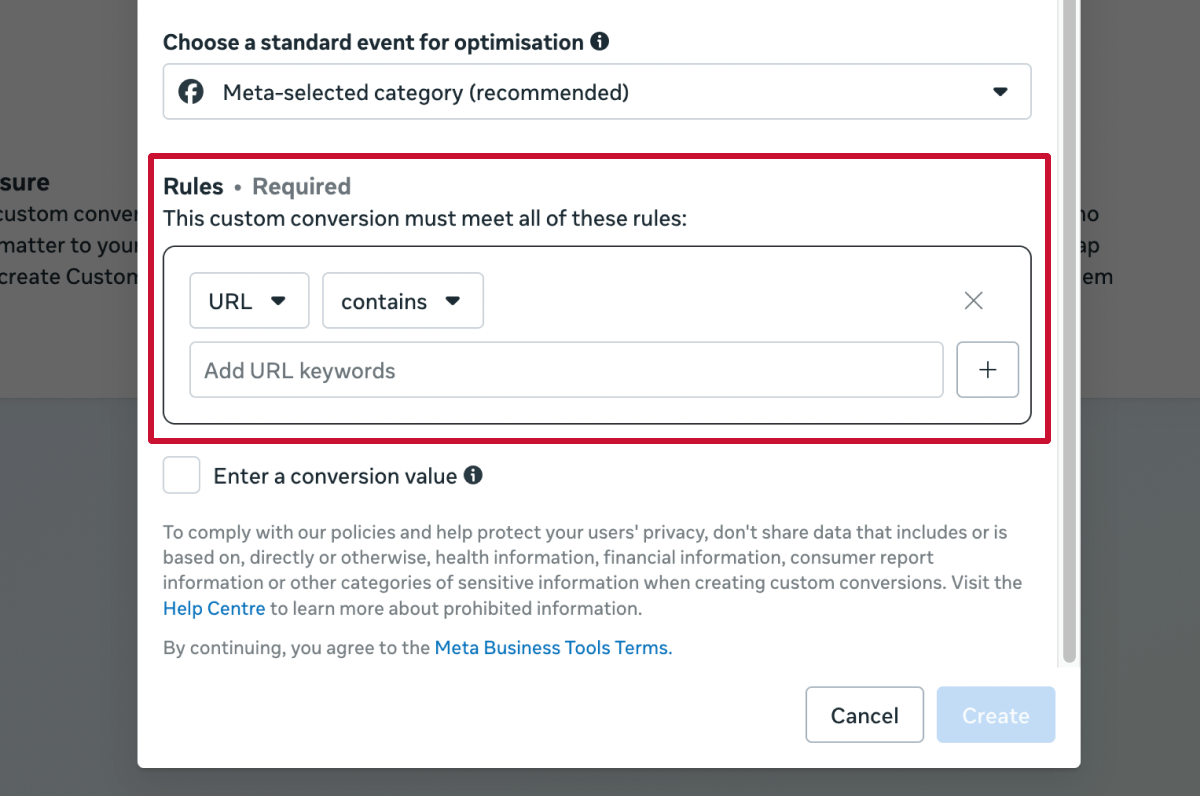
You can add as many rules as you want to customize the event.
💡 Tip: Use URL contains rather than URL equals whenever possible to avoid missed conversions caused by tracking parameters or small URL changes.
Step 4. If your events don’t already include a value (for example, purchase amount), you can add one here.
Step 5. Click “Create,” then visit the page or complete the action yourself to trigger the conversion.
Step 6. Head back to Events Manager and make sure its status shows as Active. If it doesn’t, double-check your rules.
After setting up your events or custom conversions, it’s important to confirm everything is working before running ads.
Step 1. In Meta Events Manager, open your dataset and click “Test Events.”
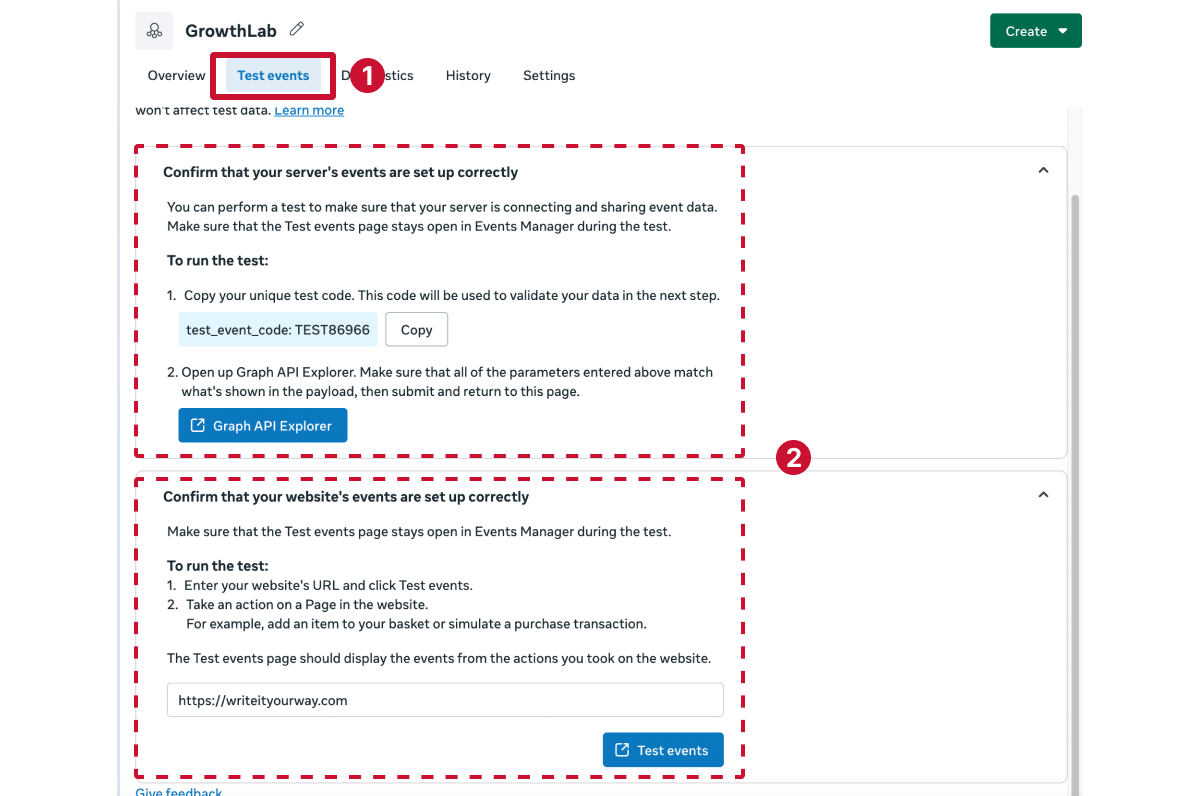
Step 2. You’ll see two testing options:
If you’re testing website events, enter your website URL, open your site in a new tab, and complete a few actions (for example, submit a form or add an item to your cart).
You should see these actions appear in real time.
If nothing shows up:
Step 3. Once your events appear in Events Manager and show an Active status, you’re ready to start using them for ads.
💡 Tip: Always test events after making changes. Catching issues early saves wasted ad spend later.
❗ If your events are firing but something still feels off, check the Diagnostics tab. It highlights common issues like missing parameters or duplicate events and points you to what needs fixing.
Whether you manage ad campaigns, social media, or analytics, getting clients’ accounts set up shouldn’t slow you down.
With Leadsie, you can request and receive access to all your clients’ accounts using just one secure link. 🔒
Leadsie is a client onboarding software that simplifies requesting and giving access to marketing assets, social media, and ad accounts with one secure link. Get access to your clients’ or influencers’ Facebook, Instagram, Google, TikTok, Shopify, LinkedIn, and other accounts without sharing passwords.
Leadsie handles the most time-consuming aspect of onboarding clients: managing access and adding users. It keeps permission management secure and organized as your agency scales.
✅ Minimize frustrating chaser emails and calls for access
✅ Reduces your agency's turnaround time by over 50%
✅ Scales with your agency as you grow beyond onboarding 5-10 new clients a week
✅ Makes it possible to get access to 23+ social, marketing, and analytics platforms at once
✅ Start billable work and billing cycles for your new clients without delays
🎁 Try a free 14-day trial on us—no credit card needed!
P.S. It's risk-free, and you get to keep your account connections after the trial ends. 🙌

Ekta Swarnkar is a freelance B2B writer for SaaS and marketing brands. She's helped various companies to grow their visibility, authority, and revenue with long-form, actionable content.


Clients struggling to share access to their
accounts? Get the access you need in minutes with a free trial of Leadsie.
Approved by Meta, Google & Tiktok
Keep access to accounts if you cancel
Secure & 100% GDPR compliant
Delete your onboarding PDF. Cancel the video call. Just send one link, and get hassle-free access to 13+ platforms in minutes. Start free today.
Approved by Meta, Google & Tiktok
Keep access to clients' accounts if you cancel
Secure & 100% GDPR compliant
Usually within minutes once your Pixel or integration is working. In some cases, it can take a few hours. If nothing shows up, it typically means tracking isn’t firing or the wrong dataset is connected.
Double-check your setup in Events Manager and make sure you’re testing the correct website.
Yes. While most businesses use Events Manager for website tracking, you can also send events from mobile apps, offline uploads (like in-store sales), or Meta messaging platforms such as Instagram and WhatsApp.
Events Manager handles tracking and event data. Ads Manager uses that data to optimize campaigns and report performance.
Start small. Most businesses only need one to three core events (like Lead or Purchase).
Tracking too many events can dilute your optimisation signal and make it harder for Meta to learn which actions matter most.
Yes. You can grant access through your Meta Business Portfolio, which is helpful if you’re working with agencies, freelancers, or internal teams.
Questions unanswered? Check out our help center or get in touch 🤠


%20Marketing%20Strategies.avif)