Clients struggling to share access to their
accounts? Get the access you need in minutes with a free trial of Leadsie.
14 day unlimited free trial
Extend until you onboard a client
No credit card required
Keep access to clients if you cancel

With easy one-link access requests for 13+ platforms your campaigns can go live in minutes, not days. Start free today.
Approved by Meta, Google & Tiktok
Keep access to clients' accounts if you cancel
Secure & 100% GDPR compliant


Meta ads are a goldmine for businesses. With an average Facebook conversion rate of 9.21% across industries, the opportunity is clearly there.
Yet many advertisers never get close to that benchmark; not because their ads are bad, but because their tracking setup is poor.
By installing the Meta Pixel, you can track real user actions like page views, form submissions, purchases, and sign-ups, and use that data to optimize ad delivery and improve conversion tracking.
The problem? If you’ve tried following Meta’s own Help Center guides, you’ve probably noticed how outdated and confusing they’ve become. Between old screenshots and renamed menus, it’s too easy to get stuck. 😵💫
This beginner-friendly guide will show you how to set up a Meta Pixel from start to finish without relying on documentation that no longer matches the interface.
Prefer a video? 👇
Meta offers a few different ways to connect your website to your Meta Pixel.
👉 Using Shopify or WordPress? Use partner integration (most businesses)
👉 Using a custom website or Webflow? Use manual setup
👉 Managing multiple accounts or need advanced tracking? Consider the Conversions API Gateway
A Meta Pixel (formerly known as the Facebook Pixel) is a small piece of JavaScript code you add to your website or app to track how people interact with your pages after seeing or clicking your Meta ads.
Once installed, the Meta Pixel collects data about visitor behavior, such as page views, purchases, form submissions, and add-to-cart actions, and sends that information back to Meta. This data helps you understand which ads drive results and how users move through your site.
Here's an example of a Meta Pixel base code:
👉 Update 2022: The Meta Pixel replaced the Facebook Pixel. If you’ve been running Facebook ads for a while, you might remember when advertisers used two separate pixels for conversions and custom audiences. Today, the Meta Pixel combines everything into a single base code that works across Facebook and Instagram.
After the Meta Pixel is installed on your website, it starts tracking events. These are specific actions visitors take on your site.
For example:
Someone views or clicks a Facebook or Instagram ad and lands on your website.
The Meta Pixel collects data when a visitor takes a specific action on your website. These actions are called events, and they show how people interact with your site.
Meta groups events into two main categories:
Standard events are predefined by Meta and cover the most common user actions, such as when someone:
These are the most commonly used events and are the easiest to set up.
Custom events let you track actions that don’t fit into Meta’s standard event list. You can define your own events to capture interactions that are specific to your website.
📋Example: Track only demo requests from visitors who reached your pricing page.
Learn more about events here.
All tracked activity is recorded in Meta Events Manager, where you can see:
In Ads Manager, you can use Pixel data to:
🔗 Related: How to Create and Share Facebook Custom Audiences & Lookalike Audiences
There are a few parts to setting up the Meta Pixel, but we’ll guide you through the process with screenshots and tips.
❗ Important: Meta’s Business Tools terms require that you only place your Meta Pixel on websites you own or have written permission to use. Installing your Pixel on third-party sites without authorization is not allowed.
✔️ Before creating and installing your Meta Pixel, make sure you have the following in place:
Here's how to create a Meta Pixel for your website:
Step 1. Go to Meta Events Manager using this link 🔗.
Step 2. In the top left, click “Connect data.”
Step 3. Since we're setting this up for a website, select “Web,” then click “Next.”

Step 4. Click “Create new dataset,” then click “Next.”

❓ Why am I creating a dataset instead of a Pixel? Don’t worry, this is not a typo. Meta now groups Pixels under something called Datasets. A dataset is simply a container that holds your Pixel data (browser events) and, if you use it, server-side data from the Conversions API.
You’re still creating a Meta Pixel; Meta just manages it inside a dataset now. Functionally, nothing changes for tracking or ads.
Step 5. Now, you'll be asked to name your new dataset.
Click “Create” when ready.
Step 6. Choose how to connect your website.
You may see one option marked as Recommended. This is based on Meta’s tracking preferences and your account details, but it doesn’t mean the other options are incomplete or incorrect.
There are three main setup paths to choose from:
Send website and conversion data directly from your server or platform to Meta (not just the browser).
It can improve tracking reliability and measurement, especially as browser privacy restrictions increase. However, it involves more setup and isn’t required to get your Meta Pixel up and running.
Best suited for: advanced tracking needs or for businesses/agencies managing multiple accounts, since a single Gateway configuration can be reused across them.
Connects your website using a platform you already use, such as Shopify or WordPress. This is a mostly no-code setup that installs the Meta Pixel, sets up standard events, and often automatically enables the Conversions API at no extra cost.
Best suited for: most businesses using supported platforms, especially eCommerce stores.
Requires building a direct integration with the Conversions API using code. This option offers the most control over what data is sent and when, but it typically requires a developer.
Best suited for: custom websites, unsupported platforms, or businesses with specific tracking requirements beyond standard events.
✔️ To make this easier to follow, we’ll briefly explain what happens in each option:
If you select the first path, Meta will walk you through an additional setup flow focused on server-side tracking.
Here’s what to expect next:
1. You’ll be asked to choose how the Gateway is hosted:
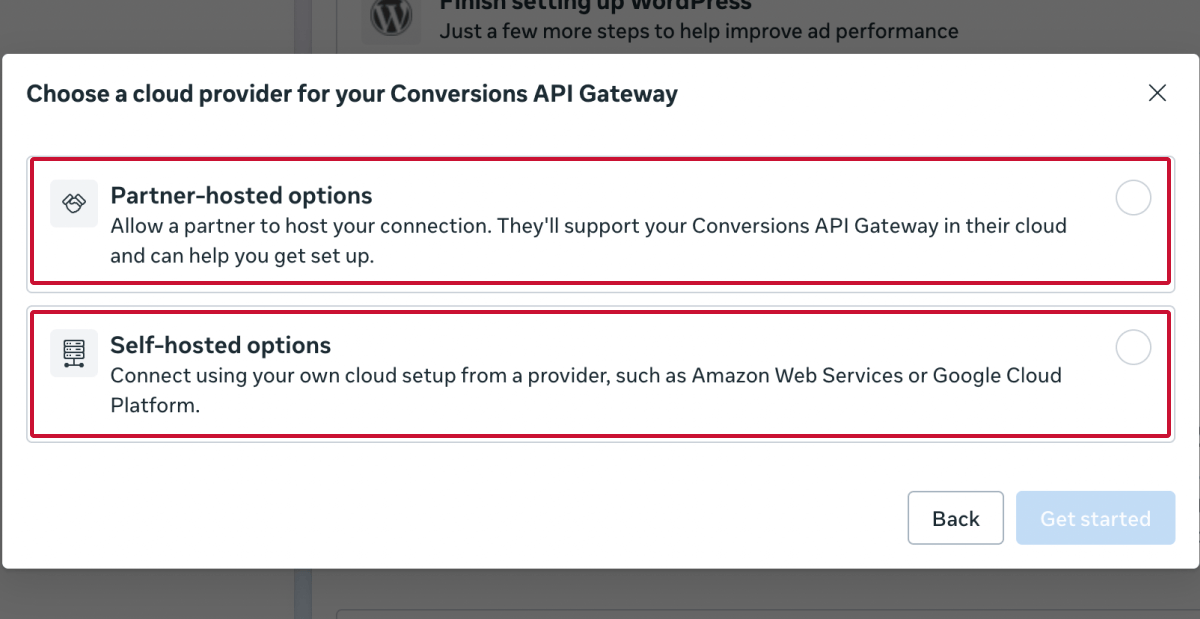
This involves picking between:
2. You’ll then follow a guided setup to connect the Gateway to your dataset. This includes generating credentials and linking the Gateway so Meta can receive events directly from your server, alongside browser-based Pixel events.
Because this setup involves infrastructure, cloud accounts, and server configuration, it’s typically handled by a developer or technical team.
For most businesses, this step is optional - your Meta Pixel will still work correctly without it.
If you choose the partner integration path, you’ll need to select the platform your website is built on (for example, WordPress or Shopify) and follow the on-screen setup steps provided by Meta and the platform.
In the sections below, we’ll walk you through Shopify and WordPress.
Once you select Shopify as your partner integration in Meta Events Manager, the setup shifts from Meta to Shopify. From here on, the two platforms work together to complete the connection.
Step 1. Click the “Go to Shopify” button.

Step 2. If the Facebook & Instagram app isn’t already installed on your store, Shopify will prompt you to install it.

Step 3. Next, Shopify will ask you to connect your Facebook account.

This step allows Shopify to:
Click “Connect account” and follow the prompts.
Step 4. After you connect your Facebook account, Shopify will submit the connection for review. This is a standard verification step and usually doesn’t require any action on your part.
Once the review is approved, Shopify automatically links your store to the Meta dataset (Pixel).
From this point on:
Step 5. Once the connection is approved and your store is set up, you can change how customer data is shared with Meta. No need to reinstall your Pixel.
You can choose between Standard, Enhanced, or Maximum at any time from Shopify’s Facebook & Instagram settings.
Learn more about Meta's data-sharing settings here.
Once you select WordPress from the list of partner integrations, Meta will show installation instructions on screen, but some of these are outdated.
Instead, follow the steps below to install the official WordPress plugin directly. 👇
Step 1. Open a new tab or window in your browser and log in to your WordPress admin panel. Then, click on “Plugins” in the left navigation menu, followed by “Add Plugin.”
Step 2. Search for the official Meta Pixel for WordPress plugin by Facebook and click “Install now.”
Step 3. Once the plugin finishes installing, click “Activate.” You’ll be redirected to your plugins list.
Step 4. Find Meta Pixel for WordPress in your plugins list and click “Settings” underneath it.
Step 5. Click “Get Started” and log in with your Facebook account in the pop-up.
Follow the instructions on screen to connect your Business Portfolio, Facebook Page, Meta Ad account, and the Meta Dataset that contains your Pixel.
🔗 Not set up with a business portfolio or Ad Account yet? Here’s how to create them step-by-step.
Step 7. On the summary screen, review the business assets you’re about to connect to WordPress.
Before continuing, toggle on “Automatic advanced matching.” This helps Meta better understand who completed actions on your website by sending hashed customer information (such as email addresses from forms) along with Pixel events.
This can help you:
Step 8. Review the permissions one final time and click “Continue.” It may take a few minutes for Meta to link your assets to WordPress.
Step 9. Once complete, click “Done” to return to your WordPress dashboard.
Your Meta Pixel is now installed and ready to track events! 🥳
If you choose manual setup, Meta will show you two installation options.

1️⃣ The first option is more advanced and gives you separate instructions for setting up the Meta Pixel (browser-based tracking) and the Conversions API (server-side tracking). It offers the most control, but developer support is required.
2️⃣ The second option is a simpler path and focuses on installing the Meta Pixel base code on your website without server-side tracking. It’s ideal if you’re working with a custom or unsupported CMS and you want to add the Pixel using HTML or a tag manager.
The steps below follow this Meta Pixel only setup.
Step 1. In a new tab or browser window, open your website’s CMS (for example, WordPress, Webflow, or a custom site) and log in.
Make sure you have admin access and can edit your site’s HTML or header code.
Step 2. Copy the Meta Pixel base code shown in Events Manager.
Paste it into the <head> section of your website, just before the closing </head> tag.
💡 Pro tip: If your site uses a global header (most CMS platforms do), adding the code once is enough. If not, make sure the code is added to every page you want tracked.
Once done, return to Events Manager and click “Continue.”
Step 3. We suggest enabling Automatic Advanced Matching, but this depends on your business needs and other privacy considerations.

This allows Meta to send hashed customer information (such as email addresses from forms) along with Pixel events, which can:
Click “Continue” when ready.
Step 4. You'll now be prompted to set up standard events, which are actions people take on your site, such as purchases or form submissions.
Click “Open Event Setup Tool.”
💡Pro tip: This is the easiest way to set up events because it doesn’t require any coding.
Step 6: In the pop-up, type in your website URL, and it will detect if a Pixel is installed. Review each suggested event, then click “Confirm.”
Step 7. For each event, you can add parameters such as value or content type to make your tracking more detailed.
Once finished, your Meta Pixel will start tracking events on your website. 🎉
After installing your Meta Pixel, it’s important to verify that it’s tracking events correctly before launching ads.
The steps below help you confirm that your Pixel is active and no setup issues are blocking your data:
Go to Meta Events Manager and select your dataset (Pixel). If your Pixel is working, its status should show as Active.
You should also be able to see recent activity, such as PageView events.
💡 Don’t worry if you don’t see any events yet. That’s normal if no one has visited your site since installation.
The Test Events tool is the quickest way to confirm your setup.
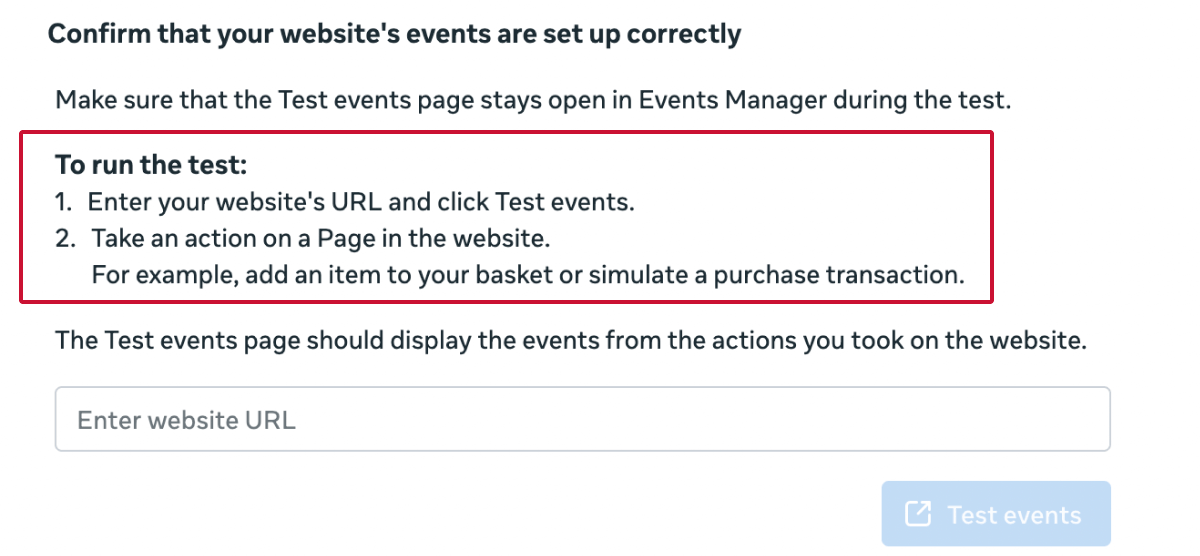
4. Perform actions on your site (visit pages, submit forms, add items to cart)
As you interact with your site, events should appear in the Test Events panel almost immediately. You may have an issue if:
If events fire once, under the correct names, and only when expected, your Pixel setup is working correctly.
The Meta Pixel Helper is a free Chrome extension that helps you quickly check whether your Meta Pixel is installed correctly and firing events as expected.
Use it to:
✅ Confirm that a Meta Pixel is installed on a page
✅ See which events fire when you load or interact with the page
✅ Spot common setup issues, such as duplicate pixels or incorrect event names
If you see errors or warnings, the Pixel Helper will usually suggest what needs fixing (for example, missing parameters or duplicate events).
💡Note: The Pixel Helper is best for checking page-based events. For button clicks, form submissions, or custom conversions, the Test Events tool in Events Manager is more reliable.
Setting up the Meta Pixel involves multiple steps, and it’s common to run into warnings or errors, especially right after installation. The good news is that most issues are easy to fix once you know what to look for.
✔️ Before you start: If you see any warnings or errors, open Diagnostics for your Pixel. This is where Meta flags setup issues and explains what needs attention and ways to improve.


This message usually appears when you’re setting up events or testing your site URL.
In most cases, it doesn’t mean anything is broken. It often shows up because:
❌ The Pixel was just installed and hasn’t been detected yet
❌ The URL entered doesn’t match where the Pixel is installed
❌ The base code isn’t loading correctly
If you’ve just finished setup, wait 30-60 minutes and try again. If the message persists, double-check that the Pixel base code is live on your site.
Currency-related warnings are some of the most common issues advertisers see.
These usually happen when:
❌ The currency code isn’t using the standard three-letter format (like USD or EUR)
❌ The value parameter is missing or incorrectly formatted
❌ Currency or value differs between the Meta Pixel and the Conversions API
While these warnings don’t always stop events from firing, they can affect reporting accuracy and return-on-ad-spend calculations. It’s worth fixing them early if you’re running conversion-focused campaigns.
Duplicate events mean the same action is being tracked more than once.
This often happens when:
❌ The Pixel is installed manually and via a plugin at the same time
❌ Automatic events are enabled on top of custom event code
❌ Purchase events are placed outside the thank-you or confirmation page
In a clean setup, most actions should trigger one event per action. Multiple events for a single click or page load can inflate results and confuse optimisation.
Meta is very strict about event names.
Standard events are case sensitive, so something as small as using purchase instead of Purchase can cause Meta to treat it as a custom event. When this happens, conversion tracking and optimisation won’t work as expected.
If Diagnostics flags an event name mismatch, check spelling and capitalisation first.
If you’ve enabled Advanced Matching, you may occasionally see warnings about invalid or restricted data.
This usually means:
❌ Customer information (like email addresses) isn’t being passed correctly
❌ Certain parameters violate Meta’s data policies
When this happens, Meta may block specific parameters or limit how the data is used.
Review what information you’re sending and make sure it aligns with Meta’s Business Tools Terms and your privacy policy.
If you installed the Pixel manually using code, take a moment to double-check the setup:
If you installed the Pixel using a tag manager (such as Google Tag Manager), review the setup there instead. In that case, the Pixel code won’t appear directly in your site’s page source.
Setting up a Meta Pixel often means first creating (or getting access to) the right Meta assets, which can slow things down, especially when working with less tech savvy clients.
Instead of going through multiple setup screens or walking clients through the process step by step, Leadsie lets you create Meta/Facebook assets directly within the platform and request access to your clients marketing platforms at the same time.
Here’s how Leadsie works:

Leadsie is a client onboarding software that simplifies requesting and giving access to marketing assets, social media, and ad accounts with one secure link. Get access to your clients’ or influencers’ Facebook, Instagram, Google, TikTok, Shopify, LinkedIn, and other accounts without sharing passwords.
Leadsie handles the most time-consuming aspect of onboarding clients: managing access and adding users. It keeps permission management secure and organized as your agency scales.
✅ Minimize frustrating chaser emails and calls for access
✅ Reduces your agency's turnaround time by over 50%
✅ Scales with your agency as you grow beyond onboarding 5-10 new clients a week
✅ Makes it possible to get access to 23+ social, marketing, and analytics platforms at once
✅ Start billable work and billing cycles for your new clients without delays
🎁 Try a free 14-day trial on us—no credit card needed!
P.S. It's risk-free, and you get to keep your account connections after the trial ends. 🙌

Sarah is a pro at writing articles that accelerate SaaS businesses' organic growth. When she’s not caught up in the thrill of content writing, you’ll find her surfing in the Atlantic Ocean and running her own yoga retreats.


Clients struggling to share access to their
accounts? Get the access you need in minutes with a free trial of Leadsie.
Approved by Meta, Google & Tiktok
Keep access to accounts if you cancel
Secure & 100% GDPR compliant
Delete your onboarding PDF. Cancel the video call. Just send one link, and get hassle-free access to 13+ platforms in minutes. Start free today.
Approved by Meta, Google & Tiktok
Keep access to clients' accounts if you cancel
Secure & 100% GDPR compliant
No. You can create a Pixel from a personal profile, but Meta strongly recommends using a Business Portfolio so you can assign roles, share access with agencies, and connect multiple assets (Pixel, Ad Account, Page) without running into permission issues later.
The base Pixel code must be placed inside the <head> section of every page you want to track. If your website uses a global header template, adding it once is enough. Otherwise, you’ll need to paste it manually across all relevant pages, or use a partner integration like WordPress, Shopify, or GTM.
Most Pixels begin tracking within 15-30 minutes, but it can take up to 72 hours for some events to appear in Events Manager, especially if the Pixel was just installed or if caching is enabled on your website.
Ideally, yes. The Pixel tracks browser events, while the Conversions API tracks server events. Using both gives you better data accuracy, particularly with privacy tools like ad blockers, iOS restrictions, and cookie limitations. Most partner integrations automatically support both.
Common reasons include:
To confirm the issue go to Event Manager and and select Data Sources > choose your Pixel > Test Events.
Questions unanswered? Check out our help center or get in touch 🤠