Clients struggling to share access to their
Hubspot
accounts? Get the access you need in minutes with a free trial of Leadsie.
14 day unlimited free trial
Extend until you onboard a client
No credit card required
Keep access to clients if you cancel

With easy one-link access requests for 13+ platforms your campaigns can go live in minutes, not days. Start free today.
Approved by Meta, Google & Tiktok
Keep access to clients' accounts if you cancel
Secure & 100% GDPR compliant


HubSpot’s flexibility is one of its biggest strengths, but it also makes managing access tricky.
With the platform’s many tools, seats, and permissions, even experienced users can get lost trying to figure out who can see or do what.
If you’re a business owner who’s spent too long trying to add a new team member or give an agency the right access—or you’re an agency struggling to get into a client’s HubSpot account—you’re in the right place.
In this guide, you’ll learn how HubSpot access really works, how to give or request it the right way, and how to streamline the whole process with a tool that gets access sorted in minutes.
TL;DR: If you just need the quick version, here’s what this guide covers. You can jump straight to any section below:
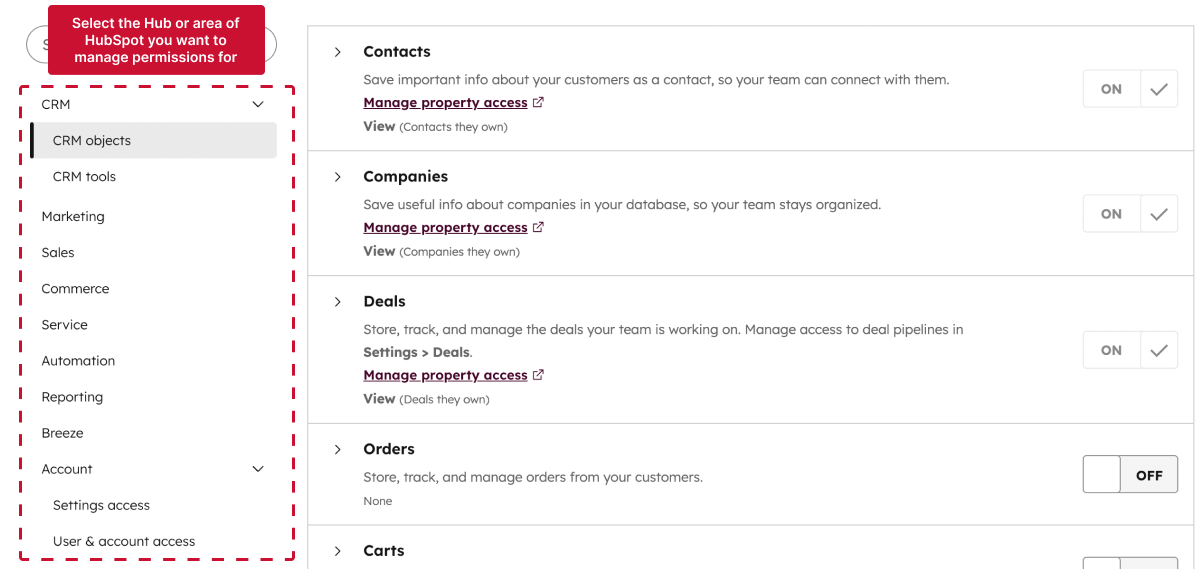
Before you add users or request access, it helps to understand how HubSpot organizes permissions.
Don’t worry, it’s simpler than it sounds. Here’s a quick breakdown:
TL;DR: Your subscription decides which Hubs and tools your business has access to. Your seats determine who can actually use those tools.
HubSpot doesn’t have a one-size-fits-all plan. Instead, it offers four main subscription levels:
📌 Note: Every HubSpot subscription includes access to the CRM, which acts as the central database for all your customer data. The higher tiers have more advanced features.
HubSpot is made up of different ‘Hubs’, and each one focuses on a different area of your business.
For example:
Each Hub follows the same pricing tiers (Free, Starter, Professional, Enterprise).
You can either choose a general subscription that includes access to multiple Hubs, or subscribe to just one Hub if you only need its specific tools.
A seat in HubSpot simply means a user.
When you invite someone to your account, you’ll assign them a seat type that controls what they can do. HubSpot currently uses a seat-based pricing model that applies to all Hubs and subscription tiers.
Here are three examples of seat types:
*Note: HubSpot’s Partner Program includes certified agencies and consultants who are trained and approved by HubSpot to help businesses set up, manage, and optimize their accounts. These partners get special access, like free Partner Seats, so they can work within client accounts without using paid Core Seats.
Since March 2024, HubSpot has been rolling out the above seats-based pricing model across all Hubs and subscription tiers.
If your account was created after March 5, 2024, you’re already using this model, AKA every user you add needs to be assigned a seat type.
If your account was created before that date, HubSpot may still be migrating you to the new system. In that case, you might not see the “Assign a Seat” step yet when adding users.
We’ll explain what this means in practice later on, but for now, just keep in mind that your account’s creation date affects how you add and manage users.
HubSpot doesn’t use fixed roles like Manager or Editor. Instead, it gives you granular control, meaning you can decide exactly what each user can view or edit by turning individual permissions on or off.
For example, you could let a marketer publish emails but not access billing details.
💡 However, there’s one exception: the Super Admin role.
Super Admins have unrestricted access to every part of your HubSpot account. They’re the only ones who can create other Super Admins or make major account-wide changes.
However, a Super Admin’s access still depends on their seat type.
For example, a Super Admin with only a Core Seat can manage settings but cannot use advanced tools like Sales Playbooks or Sequences unless they’re assigned a Sales Seat.
Seats are the first step. Permissions are the second. Even Super Admins need the right seat to open both.
If you work with an agency that is part of the HubSpot Solutions Partner Program, you can also assign users a Partner Admin role.
Partner Admins have similar access to Super Admins, but:
This role is perfect for agencies that need full operational access without using up a client’s paid Core or Sales seat.
If you just need to add a teammate, freelancer, or agency to your HubSpot account, sending an email invite is the standard way to go.
But before you start inviting people left and right, make sure your setup is ready:
Now, here’s how to add someone:
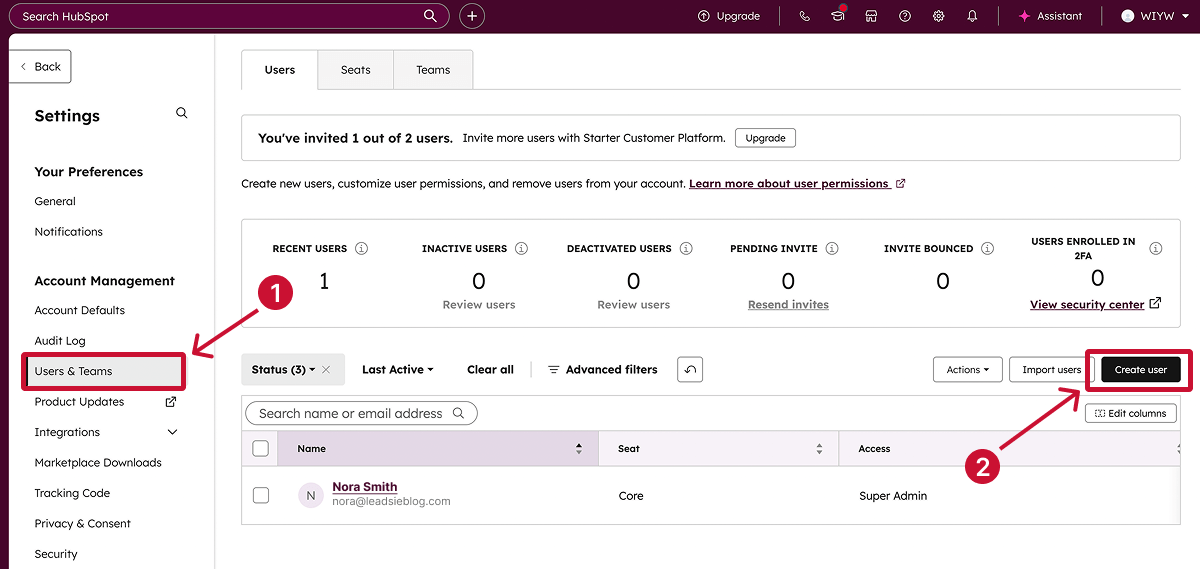
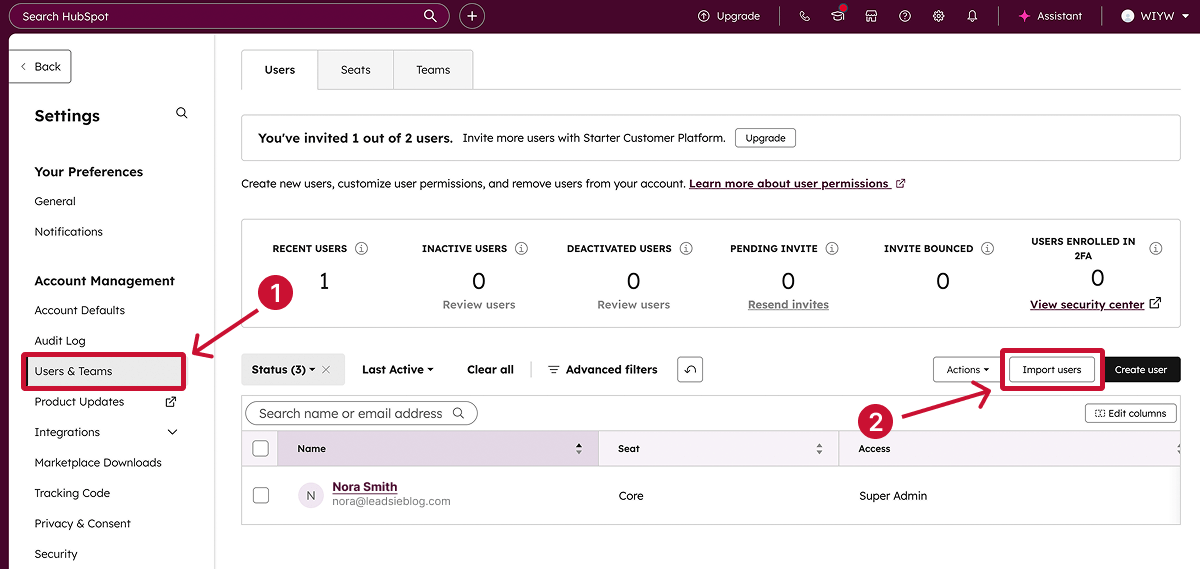
Step 1. Click the ⚙️ settings icon in the top navigation bar of your HubSpot account.
Step 2. In the left sidebar, go to “Users & Teams.” This is your control center for managing who has access and what they can do. Click “Create user.”
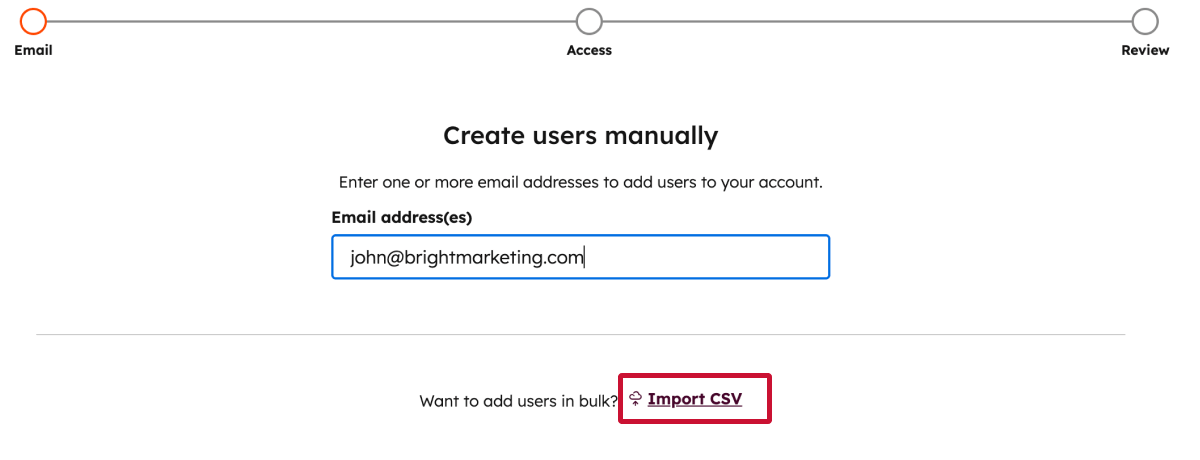
Step 3. In the Add email address(es) field, enter the email of the person (or people) you want to invite.

🔍 Pro tip: You can add multiple users at once by hitting “Enter” after each email address.
Step 4. Click “Assign a seat” to expand the section, and from the Seat assignment dropdown select the right seat type for that user.

‼️ Accounts created before 5 March 2024 may not see the Assign a seat section yet. That’s because it’s part of HubSpot’s new seat-based pricing model, which is still rolling out to older accounts. ‼️
Step 5. Click “Choose how to set access” to expand that section.
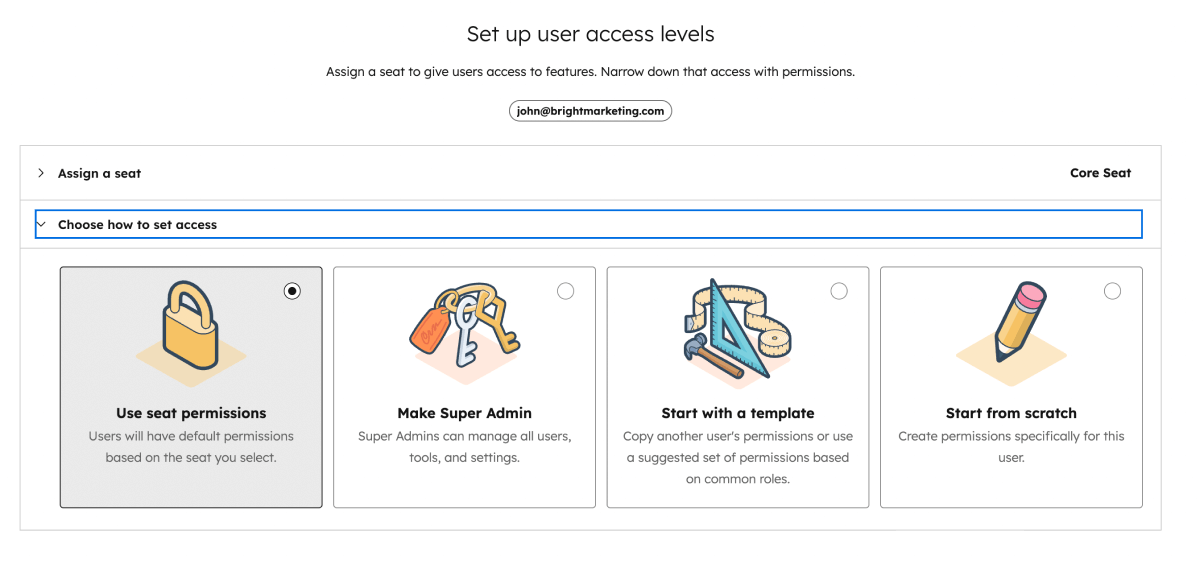
HubSpot gives you a few different options here:
‼️ HubSpot accounts created before 5 March 2024 may not see the Use seat permissions or Make Super Admin options yet. ‼️
Step 6. If you chose Start from scratch, click “Choose permissions” to expand the section. This is where you’ll set granular access—things like which Hubs they can use or what CRM data they can edit.
Step 7. Click “Next” and review your choices.
If the person you’re adding already has a HubSpot login (for another account, for example), you can skip sending a new welcome email by ticking “Don’t send an email invite when this user is added to HubSpot.” Otherwise, HubSpot will automatically send them an email invite so they can set their password and log in once you’re done.
Step 8. After creating the user, you’ll see several options to further set up your user.

HubSpot will take up to five minutes to update the new permissions across its systems.
All done! Once the user accepts the invite and logs in, they can personalize their profile and adjust notification settings.
👉 Pro tip: If you’ve just changed someone’s access, ask them to log out and log back in—permission changes only take effect after they rejoin the workspace.
If you’ve added a new user but they never got the HubSpot invite email, don’t panic; it’s usually something simple. Here’s what to check first:
⚠️ If your HubSpot account was created before 5 March 2024, you might not see this CSV import option yet. HubSpot is still updating older accounts to the new system, where every user gets a “seat.”
If you’re adding a whole team or a few clients at once, the fastest way to give access is to import users from a CSV file.
💡 Tip: HubSpot only recognizes commas (,) as separators. Using semicolons or leaving blank spaces between values will cause an upload error.
Once your file’s ready:
Step 1. In your HubSpot account, click the settings icon in the top navigation bar.
Step 2. Go to “Users & Teams” in the left sidebar and click the “Import Users” button.
Step 3. Choose your CSV file (you can drag and drop it or click “Choose a file” to browse).

If your file has headers in another language, select the matching column header language before continuing.
Step 4. Click “Next.”
HubSpot will show you a mapping table—this is where you make sure each column in your file (like “Email” or “Team”) matches the correct HubSpot property.

For example, your CSV might have a column called “Email.” HubSpot will automatically try to match that to its own “Email” field. If something doesn’t match—for example, it was named “Work Email”—you’ll just pick the right one from a dropdown.
Step 5. Make sure that everything is mapped correctly, fix any errors, then click “Next” again to move on to seat assignment and permissions.
Once imported, users will receive a HubSpot invite email to set up their account and password — or, if they already have one, they’ll be added automatically.
⚙️ Note: Only 100 users can be imported per file. If you’re adding more, just repeat the process with another CSV.
If something goes wrong while importing users from a CSV, HubSpot will usually flag the issue right away and show which rows need fixing. Here are the most common problems and how to quickly solve them:
📌 Pro tip: If you keep getting the same mapping or format error, download HubSpot’s sample user import file and mirror that structure.
If your team already uses tools like Salesforce, Microsoft Dynamics 365, Pipedrive, Zoho, or NetSuite, you can import users directly from those integrations:
Step 1. In your HubSpot account, click the settings icon in the top navigation bar.
Step 2. In the left sidebar, go to Users & Teams, and click “Create user.”
Step 3. Open the Import CSV dropdown menu, then select your connected integration.
HubSpot will automatically display users from that platform. By default, all users with complete information will be selected—clear the checkboxes next to anyone you don’t want to import.
Step 4. Follow the remaining prompts to assign seats and set granular permissions just like you would when adding users manually (Method 1).
⚠️ Note: This option only appears if the integration is already connected and active. HubSpot won’t import users from an unlinked system, and it won’t automatically create HubSpot accounts for users who are missing required info such as email addresses.
Here are some things to watch out for when importing users from third-party integrations:
If you’re trying to get into someone else’s HubSpot account, for example, as a freelancer, consultant, or agency partner, there’s no built-in “request access” feature. HubSpot doesn’t let users automatically ask for access the way Meta or Google Business does.
Instead, someone inside the account with the right permissions (usually a Super Admin or a user with Add and edit users access) has to invite you manually.
To get access, simply send your client the instructions above or use Leadsie to simplify it into a few clicks for them.
Note:HubSpot Solutions Partners have an additional option that’s faster and doesn’t take up a paid seat.
If you’re a certified HubSpot Solutions Partner or Provider, you don’t need to be invited manually like a regular user. Instead, HubSpot gives you a streamlined way to request access through your Partner account.
Here’s how it works:
This method is ideal for agencies that manage multiple client accounts. You can request access, manage employees, and update permissions directly from your Partner dashboard without juggling manual invites.
💡 Keep in mind: Partner Admins have elevated account access, but not full Super Admin privileges. For instance, they can’t manage billing or add/remove other Super Admins.
🔗 Want to automate parts of your client onboarding process? Check out our guide to the best tools for onboarding agency clients.
For most agencies and freelancers, getting HubSpot access still means waiting for a client to invite you manually. Certified partners have it slightly easier with the Solutions Partner process.
We have a better solution 💡
Leadsie is client onboarding software that simplifies the account access process. Instead of sending your client step-by-step instructions or explaining where to find settings in HubSpot, you can request access securely through a single link.
Here’s how it works 👇
It’s that easy!
So, why use Leadsie to get HubSpot access instead of the manual or partner methods?
👉 No partner status required: Anyone can request HubSpot access through Leadsie.
👉 Simple for clients: Clients just click a link and approve; no setup, no confusion.
👉 Faster onboarding: You can get access in minutes, without waiting for manual invites or admin approval delays.
👉 Accurate access levels: You specify exactly what you need—including Super Admin— ensuring you get full access from the start.
👉 All-in-one access management: Use Leadsie to request access to 20+ other platforms too (Meta, Google, LinkedIn, and more).
🔗 Related article: 6 Ways Agencies Can Automate Client Onboarding
Are you an agency that needs access to multiple marketing accounts?
With Leadsie, you can request and receive access to all your clients’ accounts in just a few minutes.
Leadsie is a client onboarding software that simplifies requesting and giving access to marketing assets, social media, and ad accounts with one secure link. Get access to your clients' X, Facebook, Instagram, Google, TikTok, Shopify, LinkedIn, and other platform accounts without sharing passwords.
Leadsie automates access management to deliver a fast, secure, and seamless onboarding experience—helping you impress clients and showcase professionalism from day one.
✅ Minimize frustrating chaser emails and calls for access
✅ Reduces your agency's turnaround time by over 50%
✅ Scales with your agency as you grow beyond onboarding 5-10 new clients a week
✅ Makes it possible to get access to 13+ social, marketing, and analytics platforms at once
✅ Start billable work and billing cycles for your new clients without delays
🎁 Try a free 14-day trial on us—no credit card needed!
P.S. It's risk-free, and you get to keep your account connections after the trial ends. 🙌

Nina is an SEO content specialist with expertise in B2B SaaS. She helps businesses increase organic traffic with strategic, high-quality content. Outside of work, you’ll find her sailing somewhere in the Mediterranean.


Clients struggling to share access to their
Hubspot
accounts? Get the access you need in minutes with a free trial of Leadsie.
Approved by Meta, Google & Tiktok
Keep access to accounts if you cancel
Secure & 100% GDPR compliant
Delete your onboarding PDF. Cancel the video call. Just send one link, and get hassle-free access to 13+ platforms in minutes. Start free today.
Approved by Meta, Google & Tiktok
Keep access to clients' accounts if you cancel
Secure & 100% GDPR compliant
HubSpot’s new seat-based pricing has been rolling out since March 2024. If your account hasn’t migrated yet, you won’t see “Assign a seat” until the update reaches your portal.
No. HubSpot can take up to five minutes to apply changes. The user must log out and back in for updates to take effect.
Only if the agency is a HubSpot Solutions Partner, since they get free Partner Seats that don’t count toward your paid limit.
Otherwise, you’ll need to be assigned a paid seat, but tools like Leadsie make the access process much faster.
Go to ⚙️ Settings > Users & Teams > Seats tab, then select “Transfer seat” or change their assigned seat type (e.g., from View-Only to Core).
Ask them to check spam or promotions folders, confirm the email address, and make sure HubSpot’s domains are allowlisted. If it bounced, contact HubSpot Support to unbounce it.
Yes. Super Admins can restrict view or edit access for certain properties so that only selected users or teams can see them.
Questions unanswered? Check out our help center or get in touch 🤠