Automate your onboarding now & join 1500+ agencies using Leadsie.
14 day unlimited free trial
Extend until you onboard a client
No credit card required
Keep access to clients if you cancel

Automate your onboarding now & join 1000+ agencies using Leadsie.
Approved by Meta, Google & Tiktok
Keep access to accounts if you cancel
Secure & 100% GDPR compliant


If you’re not already familiar, Webflow is a no-code web development platform that you can use to create and host websites.
Webflow is many companies’ go-to website builder because anyone can use it to build custom and responsive sites, stores, and blogs without any coding knowledge. With Webflow, you and your team can build custom sites using three of the most powerful programming languages — HTML, CSS, and JavaScript.
It’s simple to use and easy to access. Whether your colleague wants to create a new blog post or your client wants to change up their site colors, you can provide access to Webflow in just a few clicks.
If you’re already sold on the benefits of Webflow, you’re probably ready to get your team onboarded. In this post, we walk you through how you can provide anyone with access to the Webflow platform.
The Webflow Workspace contains all of the sites you build on Webflow. From your Workspace, you can easily create, review, manage, and make revisions to your Webflow sites.
At the Workspace level, you can invite and set teammates as Owners, Admins, or Members. Each of these roles offer varying levels of permissions. Let’s walk through
Owners have the highest level of permissions. Owners can:
Admins have the second highest level of permissions. Admins can:
Members are limited in what they can do within a Workspace. Members can:
You can also invite people outside of your organization to use a Workspace. If you are working on sites for clients then you may like to provide them with more creative control by giving them access to a Workspace. To do that, you can assign them a Guest role.
Guests can:
Once you’ve decided on the roles you want each person to take on, it’s time to give them access to your workspace.
When you invite someone to a Workspace, you can select the chosen role from the Role menu.
1. Head to your Settings in your Webflow dashboard:

2. Click Members then Invite guest:

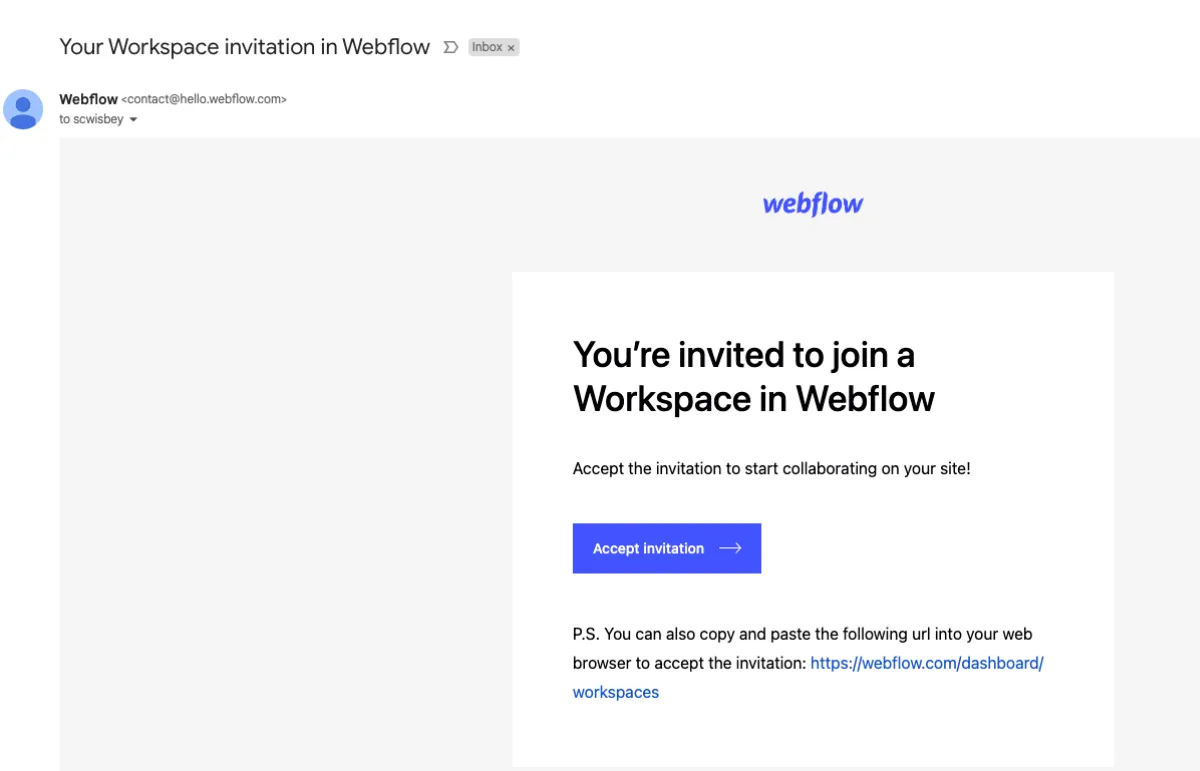
3. Enter the email address of the person you want to invite, click Invite:

4. Your agency or freelancer will receive an email to confirm they have access and will be able to confirm their access by clicking Accept invitation:
If you need to make changes to any of the roles you’ve assigned, you can modify them within a Workspace. Here’s how:

In the designer, you can manage all aspects of the site, from design and functionality. You only get access to Webflow Designer if you are added as a member in a Webflow Workspace.
The Webflow Editor only gives access to manage and edit content. This limited access is perfect if you have a freelancer or agency who needs to upload content to your site, without needing full design access.
Your team can build, design, and manage your Webflow sites within the Webflow Workspace and Webflow Design. You can also invite Guests to review sites, configure integrations, and make changes to templates.
But how do you invite people outside of your organization’s Workspace to make edits to content without making any changes to the site's design?
Enter the Webflow Content Editor - limited access that you can give to freelancers or agencies so they can upload and make edits to content.
You can give Webflow Content Editor access if you have a Webflow Business, Webflow CMS, or Webflow Ecommerce website plan.
Ready to invite a content editor? In the same process you use to invite a site member, you:
1. Head over to Site settings
2. Select the Members tab
3. Hit the Add content editor button

4. Type in your chosen site editor’s email address in the provided field
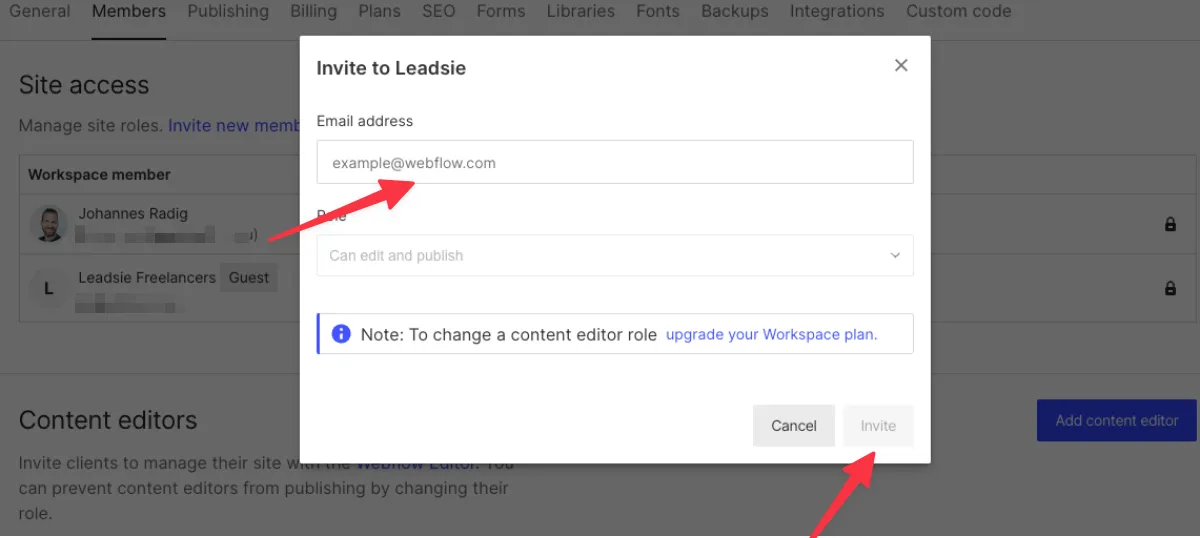
5. Click Invite
Alternatively, you can also provide content editor access straight from the Webflow Designer Home.
Here’s how:
1. Select the Share icon located in the top right corner of the toolbar when in Design mode:

2. Select Invite content editors
3. Wait for page to redirect you from Site settings to the Members tab
4. Hit the Add content editor button
4. Drop your content editor’s email address in the box provided
5. Click Invite
Your content editor will receive a unique link in their confirmation email — let them know they should look out for it. The link will take them to a landing page where they can set up their own login details and gain access to your chosen site.
These login details will only provide access to the Editor account, not to your Webflow account.
Have a Growth Workspace? You can choose your content editor’s permissions after selecting the Add content editor button from the menu. For example, you may give them edit capabilities or allow them to both edit and publish.
You can use the Webflow Editor (Webflow’s very own content management system — CMS for short) to manage and make changes to content or delete content on a client's site. From landing pages to individual blog posts, anyone with editor access can publish or revamp the site content.
If you're an agency or freelancer, you can get access to your client's site by typing:
thenameofyourclientwebsite.com/?edit

Once you arrive on the site, you will see a small arrow in the bottom right corner:

You now have access to the Webflow Editor Mode!
Click on Edit on the bottom right and you should have access to the following screen:

Keep in mind that if you click Publish, it will publish all changes that are currently on staging. Check that your client is happy for you to publish everything in the back end before clicking the button!
You don’t need a separate login to access the Webflow CMS, you can access Webflow Editor if you’re already logged in to Webflow:

In Webflow Designer, anyone on your team can design and build websites — sans code. You can use Webflow Designer to give site access to multiple people on your team, they can then edit content and track changes in real-time.
With zero coding knowledge, everyone you work with can play with color palettes, fonts, and other key site elements to help create a sleek site. They can easily make use of the drag-and-drop features, Webflow templates, and simple interface.
Once you have been invited to a Workspace by your client, you can start to use Webflow Designer to work on your Webflow project. First, you need to access your site. Here’s how:

Don’t forget — only one person can use Webflow Designer at a time 👩🏽🎨.
Looking to jump from Edit mode to Design mode? Remember only one person can use Webflow Designer at a time. If someone is currently in Design mode then you’ll need to ask for control.
Ready to request design control? Here’s how:
And that's it! Everything you need to know about giving and requesting access to Webflow. Happy designing!
If you're managing marketing accounts for your clients, did you know you can automate your onboarding processes with Leadsie?
Our tool makes the process of getting access to your client accounts easier than ever! Get started with a free 14-day trial in less than a minute. No credit card needed—Just your email address 🚀
Here's a quick demo of how easy it is to get marketing asset access using our little tool:


Kirsten is a freelance content marketing writer and conversion copywriter that specializes in tech, e-commerce, and health. She's worked with brands like Hotjar, WooCommerce, and E.ON. When she's not at her laptop, she's off dancing up a storm, perfecting her roundhouse kicks at Krav Maga, or dreaming up her next backpacking trip.


Automate your onboarding now & join 1500+ agencies using Leadsie.
14 day unlimited trial
Extend until you onboard a client
No credit card required
Keep access to accounts if you cancel
Approved by Meta, Google & TikTok
Secure & 100% GDPR compliant
Automate your onboarding now & join 1000+ agencies using Leadsie.
Approved by Meta, Google & Tiktok
Keep access to accounts if you cancel
Secure & 100% GDPR compliant
Questions unanswered? Check out our help center or get in touch 🤠