Clients struggling to share access to their
Shopify
accounts? Get the access you need in minutes with a free trial of Leadsie.
14 day unlimited free trial
Extend until you onboard a client
No credit card required
Keep access to clients if you cancel

With easy one-link access requests for 13+ platforms your campaigns can go live in minutes, not days. Start free today.
Approved by Meta, Google & Tiktok
Keep access to clients' accounts if you cancel
Secure & 100% GDPR compliant


TL;DR: Give Shopify collaborator access by approving a collaborator request sent from a Shopify Partner account. Agencies and freelancers can request collaborator access manually through the Shopify Partner Dashboard or simplify the process using a client onboarding tool like Leadsie.
Working with a team, freelancer, or agency on your Shopify store?
Shopify lets you grant either staff access or collaborator access depending on the type of user. We’ll walk you through how both options work, how to request access as an agency or freelancer, and how to avoid common collaborator access issues. 👇
Not sure where to start? Jump to the option that matches what you’re trying to do:
Shopify has two main types of admin roles: staff permissions and collaborator permissions. The right option depends on whether you’re giving access to an internal team member, freelancer, or agency.
Staff permissions are for your in-house team—employees or contractors who work on your Shopify store regularly.
If you grant someone staff permissions, they will be able to:
Staff accounts count toward your Shopify store’s staff limit, which varies depending on your Shopify plan.
💡 Tip: Customize permissions to suit each team member’s role. For example, your marketing manager doesn’t need access to order fulfillment, and your customer support agent doesn’t need to edit your product catalog.
Shopify collaborators are Shopify Partners, usually freelance developers, marketers, or agencies, who can access and work on your Shopify store without being added as regular staff users.
Collaborators log in via the Shopify Partner Dashboard or the Shopify mobile app. These accounts do not count toward your staff member limit.
On the other hand, staff members work directly inside your Shopify admin dashboard using individual staff accounts.
You can decide what each collaborator has access to and edit or remove their permissions anytime through your Shopify admin dashboard.
You can give access to your Shopify store by adding someone as either a staff member or a collaborator, depending on their role in your business.
Below, we’ll walk through the steps for setting up both staff permissions and collaborator access separately.
🎥 Video walkthrough:

You can give staff permissions in Shopify by adding a new staff member through the Users and permissions section of your Shopify admin dashboard. From there, you can choose exactly what they can access, including orders, products, customers, and reports.
Here’s the step-by-step process:
Step 1: Log in to your Shopify store admin page.
Step 2: Click on “Settings” at the bottom of the menu on the left.
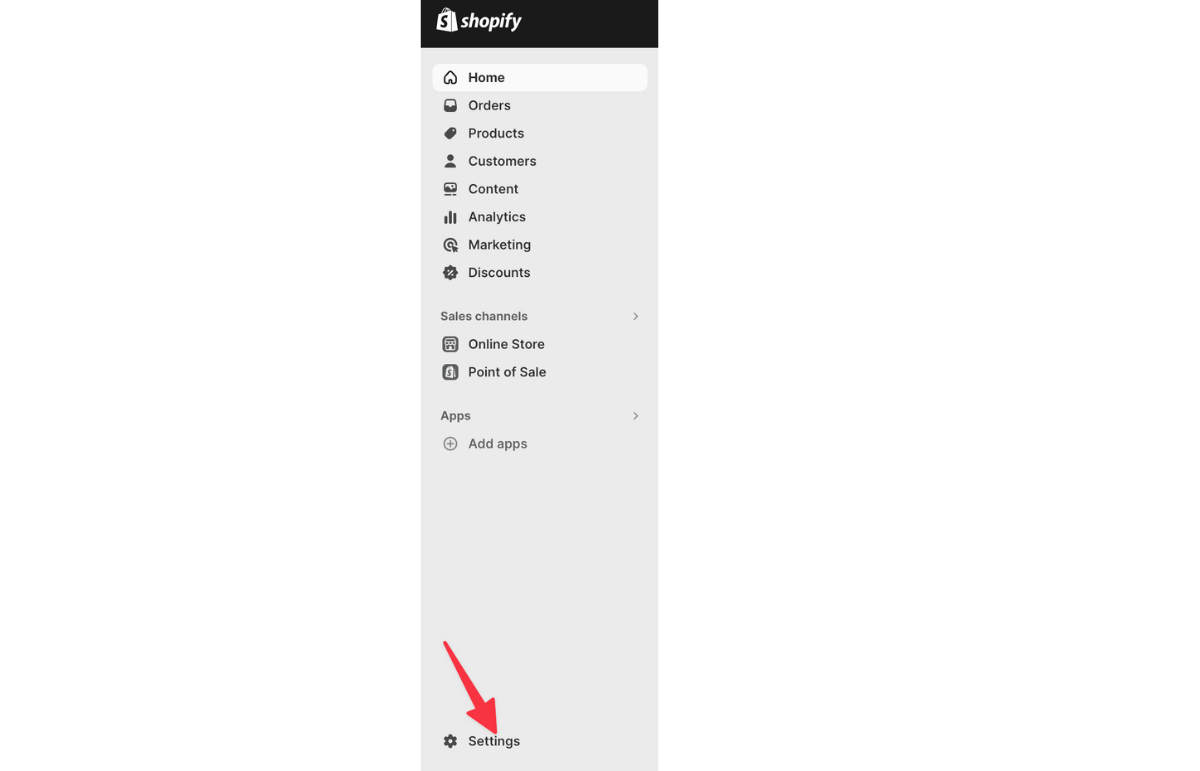
Step 3: Select "Users and permissions."
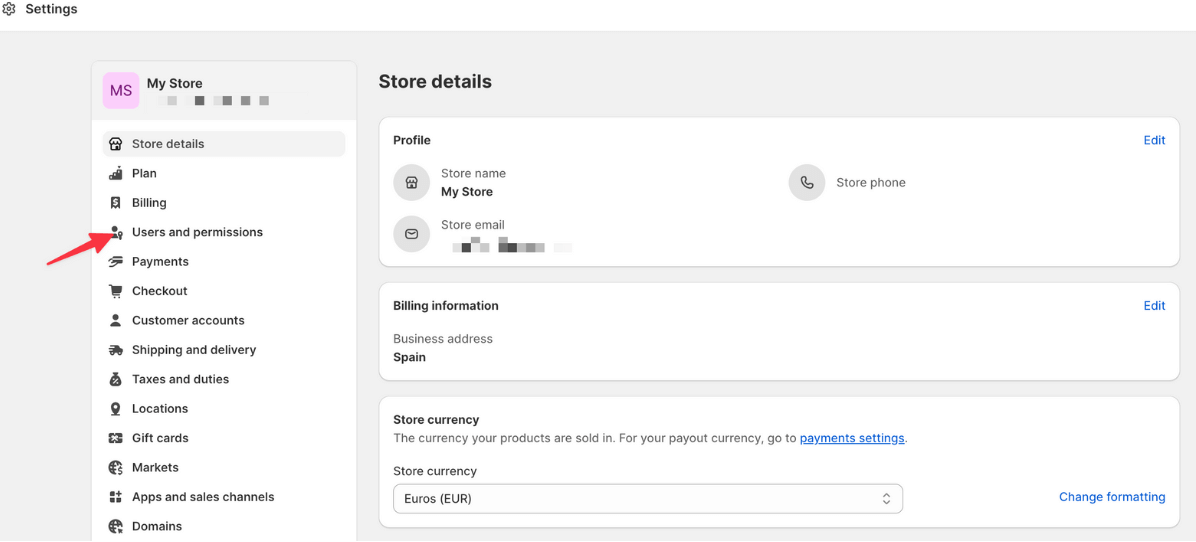
Step 4: Click "Add Staff" to add a new person.
Step 5: Enter the staff member’s name and email address.
Step 6: Choose the permissions you want to grant:
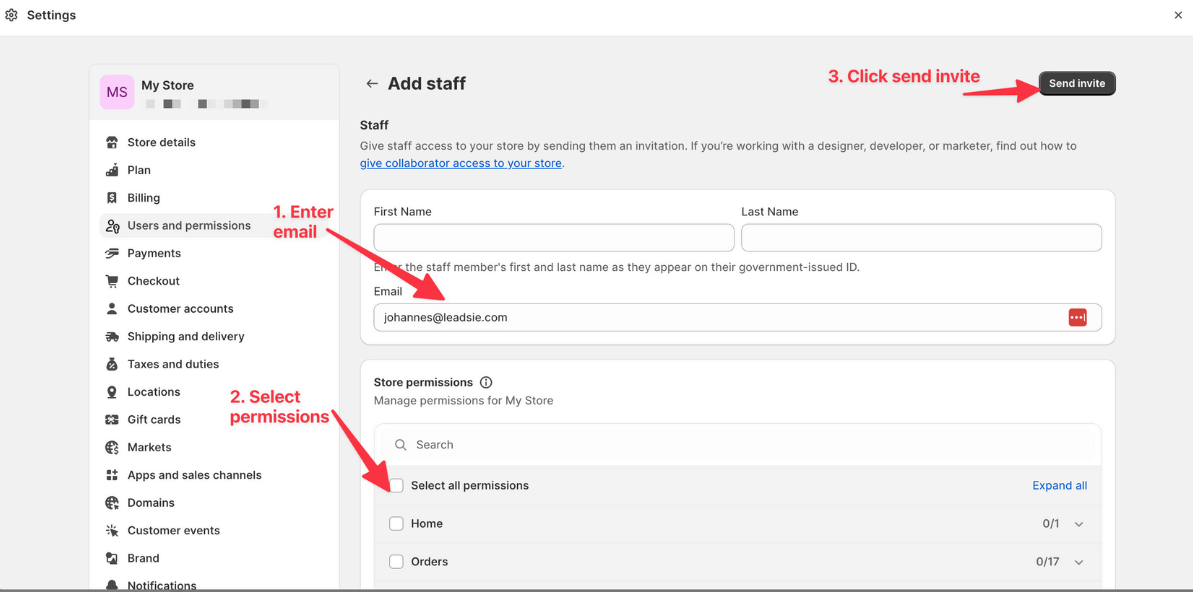
Step 7: Click "Send Invite" once you’ve set the right permissions.
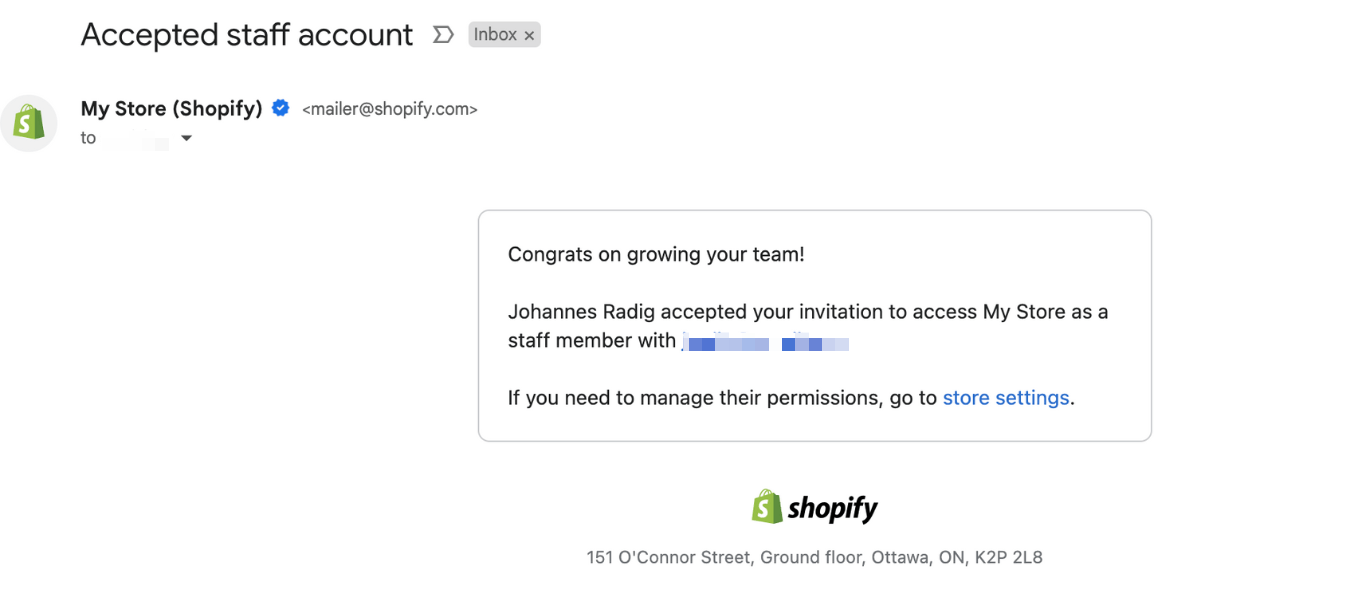
Your staff member will get an email invitation. They must follow the steps to create a staff account or log in with their Shopify ID.
🔎 Note: If you need to find your Shopify Store ID, you can usually find it in your browser URL after logging in to Shopify. It appears after /store/ in URLs.

Once they accept the invite, you will get an email notification:
📝 Important Notes:
You can give collaborator access in Shopify by approving a collaborator request sent from a Shopify Partner account. If you have enabled collaborator request access codes, you’ll need to share the code with your collaborator so they can include it in their access request.
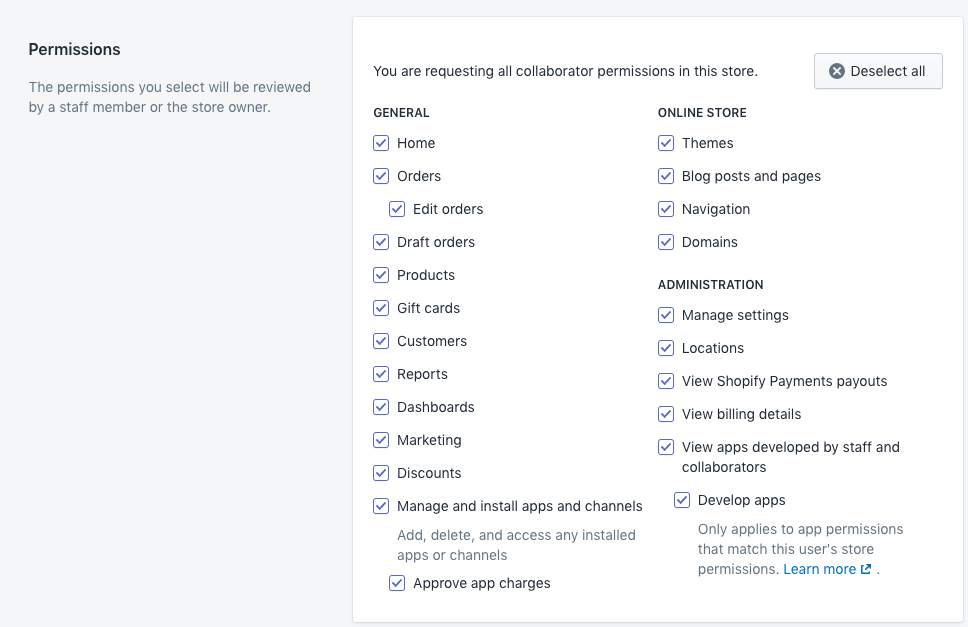
Once approved, you can choose exactly which permissions the collaborator has access to without adding them as a staff member.
This is the full list of permissions you can grant to a collaborator:
You can set up a Shopify collaborator access code from the Users and permissions section of your Shopify admin. Once enabled, only people with your unique collaborator code can send access requests to your store.
Collaborator request codes help ensure you only receive genuine access requests from people you know and want to work with.
Here’s how to set up a request code:
Step 1: Head to Users and permissions.
Step 2: Go to the Collaborators section.
Step 3: Select "Only people with a collaborator request code can send a collaborator request."
Step 4: Click "Generate new code."
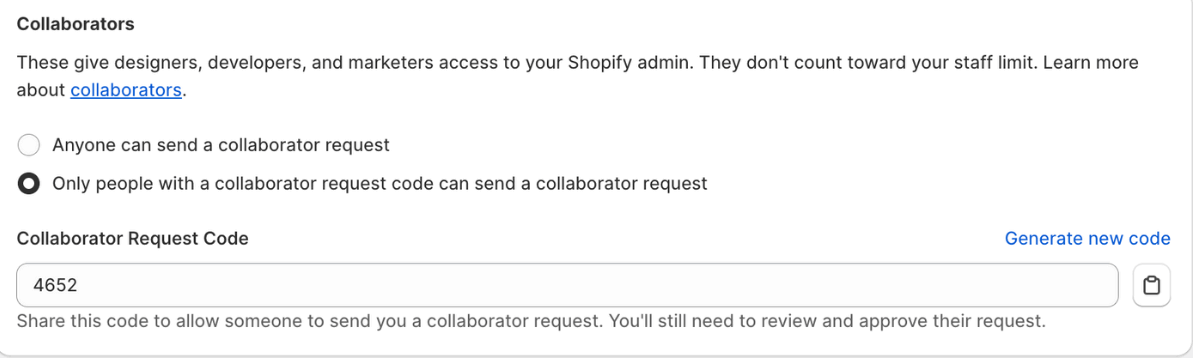
❗ Important: Your agency or freelancer will need to ask you for this code before they can send you a Shopify collaborator request.
You can request collaborator access to a client’s Shopify store either manually through the Shopify Partner Dashboard or by using a client onboarding tool like Leadsie to simplify the process.
Note: You’ll need a Shopify Partner account before requesting access to a client’s store. You can easily create one here if you don’t already have one.
🎥 Video walkthrough:

To request collaborator access manually, you’ll need to submit an access request through the Shopify Partner Dashboard using your client’s Shopify store URL.
Here’s the step-by-step process:
Step 1: Create a Shopify Partners Account.
Step 2: Log in to your Partner Dashboard.
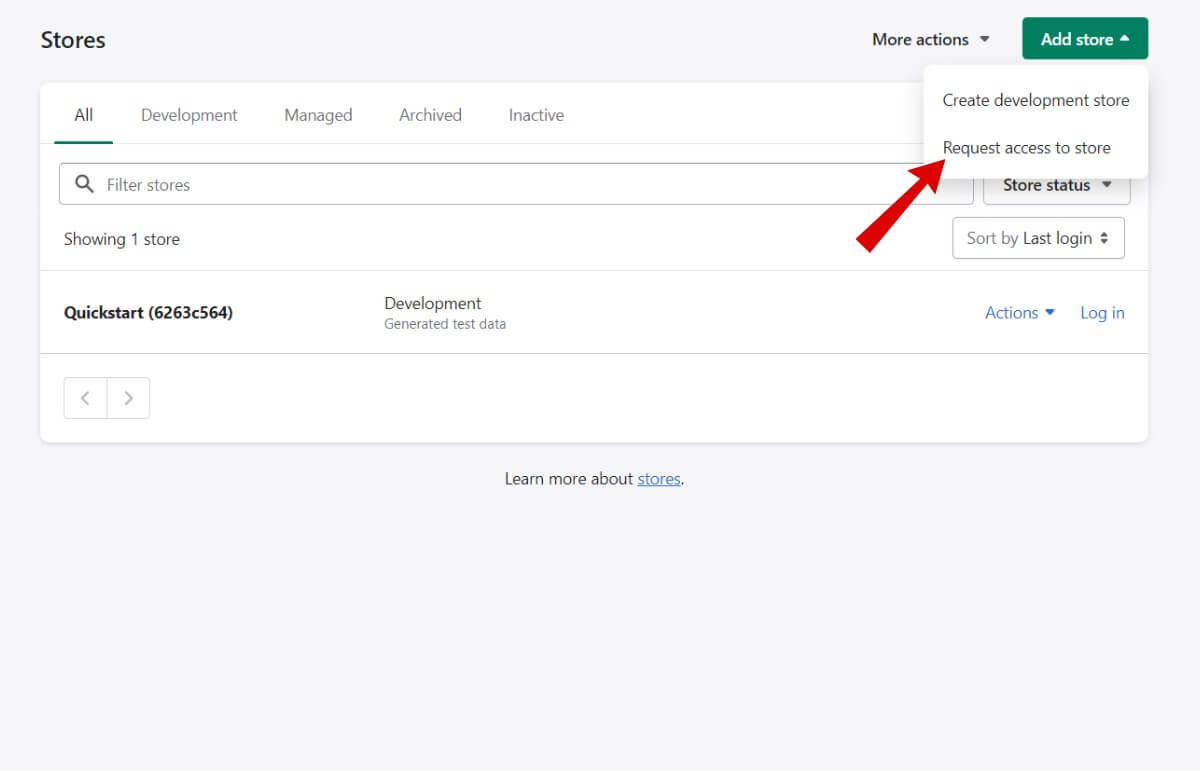
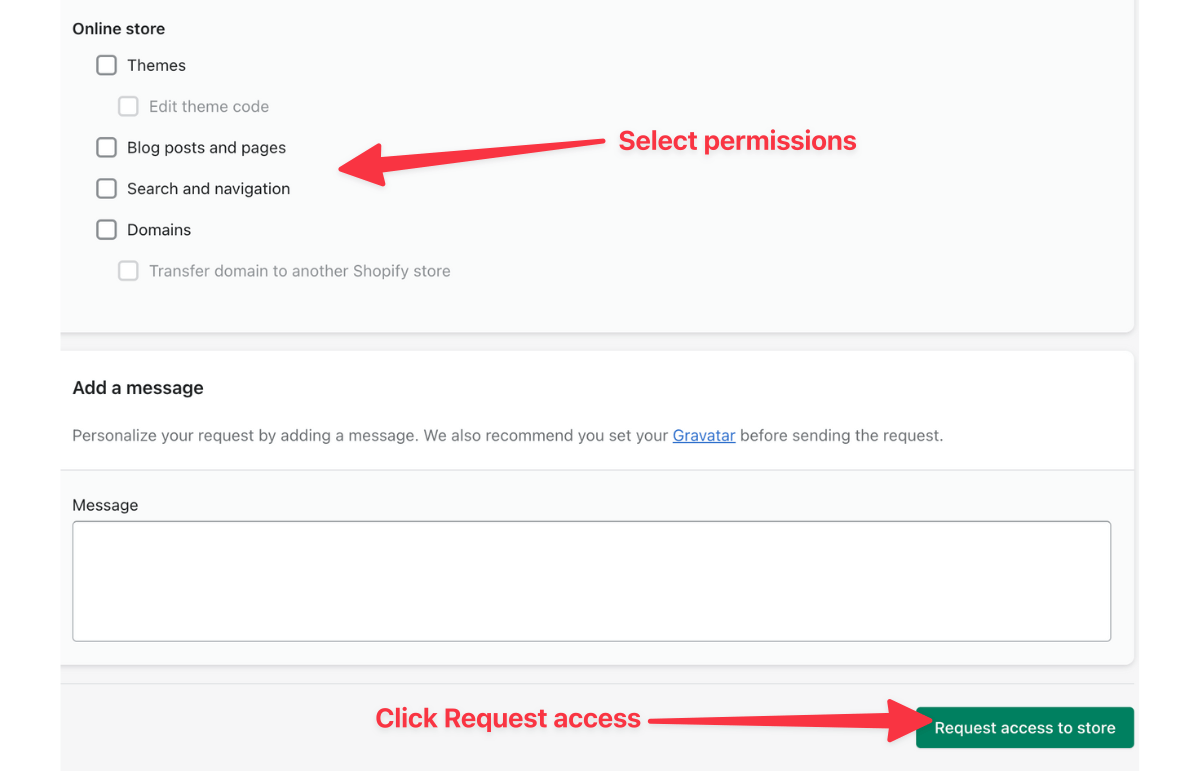
Step 3: Go to the Stores tab and click Add Store > Request Access to Store.
Step 4: Enter the URL of your client’s store.
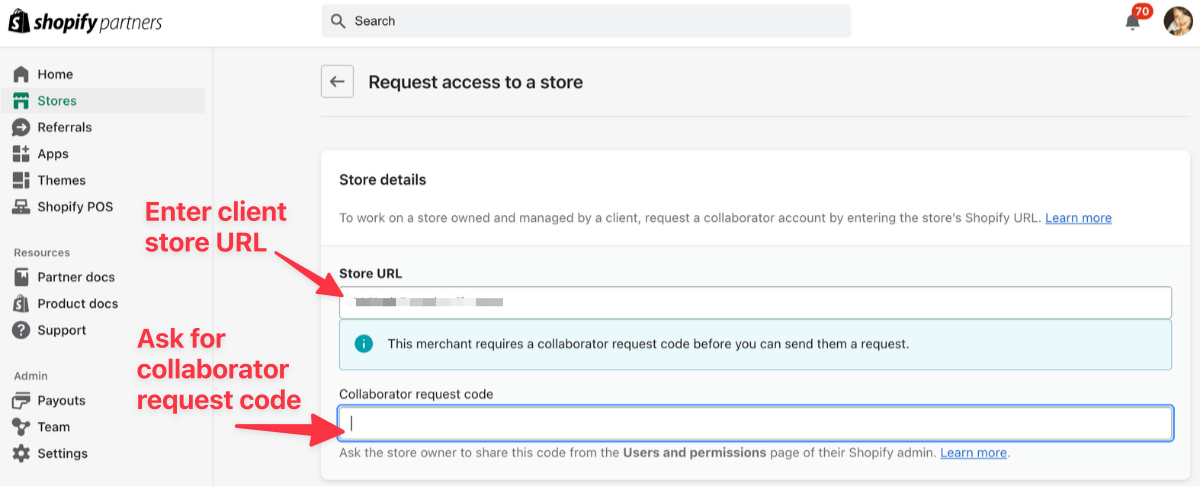
Step 5: If your client has set up a 4-digit collaborator code, ask them for it and enter it here.
Step 6: Select the permissions you need (or click Select All for full access).
Step 7: Add a personalized message and hit Request Access to Store.
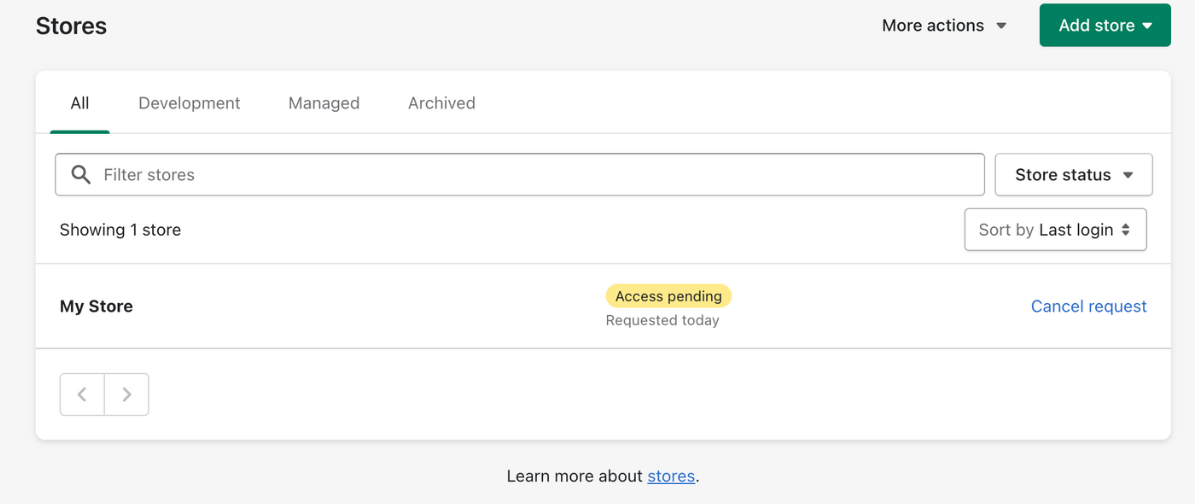
Step 8: Once your client approves the request, you’ll have access through your Partner Dashboard.
💡 Tip: If you manage assets for more than one Shopify store, you can see them all in the Stores tab of your Partner Dashboard. Here is where you can modify your requests.
You can request Shopify collaborator access with Leadsie by sending your client a secure access link instead of manually submitting requests through the Shopify Partner Dashboard.
Once your client opens the link, they can select their Shopify store and approve the permissions you need in just a few clicks.
How Leadsie works:
Why choose Leadsie?
✅ It’s fast: No waiting for request approvals or dealing with codes.
✅ It’s simple: Clients don’t need to navigate complicated Shopify settings.
✅ It’s secure: The client has full control because they choose exactly which permissions to grant.
If you’re not already using Leadsie, try the easiest way to get Shopify collaborator access for free here!
You can remove a client’s Shopify store from your Shopify Partner Dashboard by going to the Stores section of your Partner Dashboard and removing your collaborator access to that store.
Here’s how:
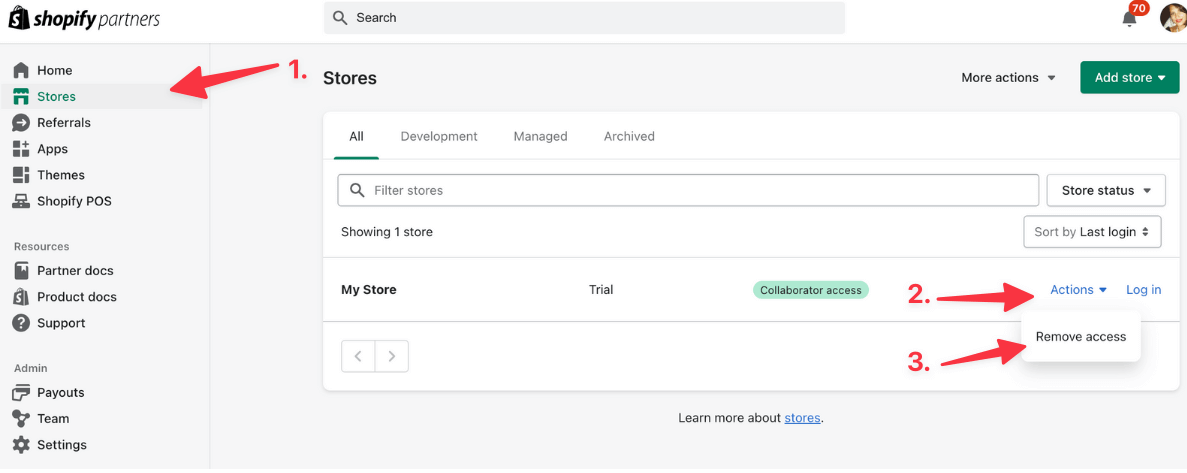
Step 1: Click the Stores tab in your Partner Dashboard.
Step 2: Find the store you want to leave.
Step 3: Click Actions > Remove access.
Even when following the correct steps, Shopify collaborator access requests can sometimes fail because of old permissions, declined requests, or account conflicts.
Here are some of the most common Shopify collaborator access errors and how to solve them.
This error usually happens when the email connected to your Shopify Partner account already exists as a staff account on the Shopify store.

The store owner will need to remove the existing staff account tied to that email address before a new collaborator request can be sent.
Here’s what to do:
Alternatively, you can update the email address used for the existing store account before requesting collaborator access again.
Sometimes a collaborator or staff account is removed, but Shopify still keeps a connection between the email and the store. This can stop new collaborator requests from going through.

This usually means your email is still linked to the store as a staff account somewhere in Shopify’s system.
To resolve it:
If the issue still persists after removing all references, you may need to contact Shopify Support so they can manually clear the old association from their system.
If a client accidentally declined your collaborator request, Shopify may block new requests from being sent.

You might see an error where Shopify asks for a collaborator code, but no field appears to enter it.
Unfortunately, this is something Shopify Support usually needs to reset manually.
The fastest solution is to:
Once Shopify clears the restriction, you should be able to request collaborator access again normally.
Are you an agency that needs access to multiple marketing or social media accounts?
With Leadsie, you can request and receive access to all your clients’ accounts in just a few clicks.
Leadsie is a client onboarding software that simplifies requesting and giving access to marketing assets, social media, and ad accounts with one secure link. Get access to your clients' X, Facebook, Instagram, Google, TikTok, Shopify, LinkedIn, and other platform accounts without sharing passwords. 🔒
%20540px.gif)
Leadsie automates account access management to deliver a fast, secure, and seamless client onboarding experience, helping you impress clients and showcase professionalism from day one.
✅ Minimize frustrating chaser emails and calls for access
✅ Reduces your agency's turnaround time by over 50%
✅ Scales with your agency as you grow beyond onboarding 5-10 new clients a week
✅ Makes it possible to get access to 14+ social, marketing, and analytics platforms at once
✅ Start billable work and billing cycles for your new clients without delays
🎁 Try a free 14-day trial on us—no credit card needed!
P.S. It's risk-free, and you get to keep your account connections after the trial ends. 🙌

Sarah is a pro at writing articles that accelerate SaaS businesses' organic growth. When she’s not caught up in the thrill of content writing, you’ll find her surfing in the Atlantic Ocean and running her own yoga retreats.


Clients struggling to share access to their
Shopify
accounts? Get the access you need in minutes with a free trial of Leadsie.
Approved by Meta, Google & Tiktok
Keep access to accounts if you cancel
Secure & 100% GDPR compliant
Delete your onboarding PDF. Cancel the video call. Just send one link, and get hassle-free access to 13+ platforms in minutes. Start free today.
Approved by Meta, Google & Tiktok
Keep access to clients' accounts if you cancel
Secure & 100% GDPR compliant
No. Collaborators cannot access billing information by default. Only store owners and staff members with billing permissions can view or manage Shopify billing settings.
Yes. Store owners can choose exactly which permissions collaborators can access, including products, themes, apps, orders, reports, and more.
Unlike staff invitations, collaborator requests don’t typically expire automatically. However, store owners can decline, ignore, or remove requests at any time through Shopify Admin.
Yes. Shopify allows multiple collaborators to access the same store at the same time, each with their own permission settings.
No. Collaborators cannot manage users or staff accounts unless they’ve specifically been granted permissions that allow access to certain administrative settings.
Questions unanswered? Check out our help center or get in touch 🤠

%20Marketing%20Strategies.avif)

